Introduction
Welcome to the Sovereign SDK Book!
With P99 of transaction executions under 10 milliseconds, the Sovereign SDK is fast enough to bring complex financial systems, like Central-Limit Orderbooks (CLOBs), fully on-chain.
The Sovereign SDK provides much more flexibility and performance than traditional blockchain frameworks. In this guide, you'll learn to take full advantage of the SDK's unique features and bring your app from idea to production.
Let's get started!
Why Build a Dedicated Rollup For Your Application?
For almost a decade, developers have been forced to build applications on shared, general-purpose blockchains. This model forces apps with vastly different needs to compete for the same limited blockspace. Building your application as a dedicated rollup gives you three strategic advantages:
- Dedicated Throughput: Your users will never have to compete with a viral NFT drop. A rollup gives your application its own dedicated lane, ensuring a consistently fast and affordable user experience.
- Capturing More Value: On shared blockchains, user fees primarily benefit the chain operators (i.e. L1 validators or general-purpose L2 sequencers). With a rollup, your application and its users can capture the vast majority of that value, creating a sustainable economic engine for your project.
- Full Control & Flexibility: Go beyond the limitations of a shared virtual machine. A rollup gives you full control over the execution environment, allowing you to define your own rules for how transactions are processed. With a rollup, you're in the driver's seat.
Why Choose the Sovereign SDK?
The Sovereign SDK is designed around four key goals to provide an unmatched developer and user experience:
- Total Customization: While rollups promise flexibility, existing frameworks are overly restrictive. With its modular Rust runtime, Sovereign SDK empowers you to customize as much or as little as neeeded. Easily add custom fee logic, integrate tailored authenticators, prioritize specific transaction types, or even swap out the authenticated state store. All without wrestling with legacy code.
- Best-in-Class Performance: With P99 < 10 ms for transaction execution and throughput exceeding 30,000 User Operations Per Second, the Sovereign SDK is orders of magnitude faster than competing frameworks like Orbit, the OP Stack, or the Cosmos SDK.
- Developer-Friendly Experience: Write your logic in standard Rust, run
cargo build, and get a complete full-node implementation with REST & WebSocket APIs, an indexer, auto-generated OpenAPI specs, and a sequencer with automatic failover out of the box. No deep blockchain expertise required. - Future-Proof Architecture: Never get locked into yesterday's tech stack. With the Sovereign SDK, you can switch data availability layers or zkVMs with just a few lines of code, ensuring your project remains agile for years to come.
How It Works
As a developer, you write your rollup's business logic in Rust, and the SDK handles the complexity of creating a complete, production-ready node implementation.
The magic happens in two stages: real-time execution and on-chain settlement.
-
Real-Time Execution (Soft Confirmations): Users send transactions to a sequencer. The sequencer executes these transactions instantly (typically in under 2-5ms) and returns a "soft confirmation" back to the user. This provides a real-time user experience that feels like a traditional web application.
-
On-Chain Settlement & Verification: Periodically, the sequencer batches thousands of these transactions and posts them to an underlying Data Availability (DA) layer like Celestia. From this point, the rest of the network—the full nodes—can read the ordered data and execute the transactions to independently verify the new state of the rollup.
Finally, specialized actors called provers (in zk-rollup mode) or attesters (in optimistic-rollup mode) generate cryptographic proofs or attestations that the state was computed correctly. These are posted back to the DA layer, allowing light clients and bridges to securely verify the rollup's state without having to re-execute every transaction.
This two-stage process gives you the best of both worlds: the instant, centralized execution needed for high-performance applications, combined with the censorship-resistance and trust-minimized verification of a traditional blockchain.
Ready to Build?
In the next section we'll get you up and running with your first Sovereign SDK rollup.
Running the Starter Rollup
This chapter is about one thing: getting to run your first rollup. We'll do this by cloning a pre-built starter rollup and running it on your local machine. We'll save the fun part—writing your own code—for the next chapter.
Prerequisites
Before you begin, ensure you have the following installed on your system:
- Rust: Version 1.88 or later. We recommend installing it via rustup. The starter repository uses a
rust-toolchain.tomlfile to automatically select the correct toolchain version. - Node.js and npm: Version 20.0 or later. We'll use this for the Typescript client in a later chapter. Install here.
- Git: For cloning the starter repository.
Running the Rollup
With the prerequisites installed, running the rollup takes just two commands.
-
Clone the starter repository:
git clone https://github.com/Sovereign-Labs/rollup-starter.git cd rollup-starter -
Build and run the node:
cargo runYou should see a stream of log messages, indicating that the rollup node is running and producing new blocks. Keep this terminal window open.
Note: The first build can take several minutes as Cargo downloads and compiles all the dependencies. Subsequent builds will be much faster.
Verifying the Node is Running
Open a new terminal window. We can verify that the node is running and all its core components have loaded by querying its list of modules.
Modules are the individual building blocks of a Sovereign SDK rollup, each handling a specific feature like token management (bank) or the sequencer registry. Let's query the /modules endpoint to see which ones are active in the starter rollup:
curl 'http://127.0.0.1:12346/modules'
If everything is working, you should see a JSON response listing the default modules included in the starter rollup, like bank, accounts, and sequencer_registry.
{
  "data": {
    "modules": [
      "bank",
      "sequencer_registry",
      "accounts",
      "value_setter"
      // ... and others
    ]
  },
  "meta": {}
}
What's Next?
Now that you've successfully run the starter rollup, let's get you building your own.
Quickstart: Your First Module
In this section, you’ll write and deploy your own business logic as a rollup.
We'll start with a very basic ValueSetter module that's already included in the rollup-starter.
The ValueSetter module currently stores a single number that any user can update. We want to ensure that only one user (the admin) has permission to update this number.
This requires four changes:
- Add an
adminfield to the module's state to store the admin address. - Create a configuration struct so that we can set the admin address when the rollup launches.
- Initialize the
adminfrom the configuration struct in thegenesismethod, which sets up the module's initial state. - Add a check in the
callmethod to verify that the transaction sender is the admin.
Let's get started.
Step 1: Understand the Starting Point
First, navigate to the value-setter module in the starter repository and open the src/lib.rs file.
# From the sov-rollup-starter root
cd examples/value-setter/
The code in this file defines the module's structure and a call method that lets anyone set the value.
Here’s the simplified lib.rs that we'll start with:
// In examples/value-setter/src/lib.rs

#[derive(Clone, ModuleInfo, ModuleRestApi)]
pub struct ValueSetter<S: Spec> {
    #[id]
    pub id: ModuleId,

    /// Holds the value
    #[state]
    pub value: StateValue<u32>,
}

#[derive(Clone, Debug, PartialEq, Eq, JsonSchema, UniversalWallet)]
#[serialize(Borsh, Serde)]
#[serde(rename_all = "snake_case")]
pub enum CallMessage {
    SetValue(u32),
}

impl<S: Spec> Module for ValueSetter<S> {
    type Spec = S;
    type Config = (); // No configuration yet!
    type CallMessage = CallMessage;
    type Event = ();
    type Error = anyhow::Error;

    // The `call` method handles incoming transactions.
    // Notice it doesn't check *who* is calling.
    fn call(&mut self, msg: Self::CallMessage, _context: &Context<S>, state: &mut impl TxState<S>) -> Result<(), Self::Error> {
        match msg {
            CallMessage::SetValue(new_value) => {

                self.value.set(&new_value, state)?;

                Ok(())
            }
        }
    }
}
Step 2: Implement the Admin Logic
Now, let's secure our module. We'll perform the four edits we outlined earlier.
a) Add the admin State Variable
First, we need a place to store the admin's address. We'll add a new admin field to the ValueSetter struct and mark it with the #[state] attribute.
// In examples/value-setter/src/lib.rs

#[derive(Clone, ModuleInfo, ModuleRestApi)]
pub struct ValueSetter<S: Spec> {
    // ... existing code ...

    /// The new state value to hold the address of the admin.
    #[state]
    pub admin: StateValue<S::Address>,
}
b) Define a Configuration Struct
Next, we need a way to tell the module who the admin is when the rollup first starts. We do this by defining a Config struct. The SDK will automatically load data from a genesis.json file into this struct.
// In examples/value-setter/src/lib.rs

// Add the module's configuration, read from genesis.json
#[derive(Clone, Debug, PartialEq, Eq)]
#[serialize(Serde)]
#[serde(rename_all = "snake_case")]
pub struct ValueSetterConfig<S: Spec> {
    pub admin: S::Address,
}
c) Initialize the Admin at Genesis
With our Config struct defined, we can now implement the genesis method. This function is called once when the rollup is launched. It takes the config as an argument and uses it to set the initial state.
We also need to tell the Module implementation to use our new ValueSetterConfig.
// In examples/value-setter/src/lib.rs

// ... existing code ...

impl<S: Spec> Module for ValueSetter<S> {
    type Spec = S;
    type Config = ValueSetterConfig<S>; // Use the new config struct
    type CallMessage = CallMessage;
    type Event = ();
    type Error = anyhow::Error;

    // `genesis` initializes the module's state. Here, we set the admin address.
    fn genesis(&mut self, _header: &<S::Da as sov_modules_api::DaSpec>::BlockHeader, config: &Self::Config, state: &mut impl GenesisState<S>) -> Result<()> {
        self.admin.set(&config.admin, state)?;
        Ok(())
    }

    fn call(&mut self, msg: Self::CallMessage, context: &Context<S>, state: &mut impl TxState<S>) -> Result<(), Self::Error> {
// ... existing code ...
Note: The
genesismethod is called only once, when the rollup first starts. If you've previously run the rollup, you'll need to clear the database and restart from scratch to ensure thegenesismethod runs again and theadminis set. You can do this using themake clean-dbcommand.
d) Add the Admin Check in call
The final piece. We'll modify the call method to read the admin address from state and compare it to the transaction sender. If they don't match, the transaction fails.
// In examples/value-setter/src/lib.rs
// ... existing code ...

    fn call(&mut self, msg: Self::CallMessage, context: &Context<S>, state: &mut impl TxState<S>) -> Result<()> {
        match msg {
            CallMessage::SetValue(new_value) => {
                // Read the admin's address from state.
                let admin = self.admin.get_or_err(state)??;

                // Ensure the sender is the admin.
                anyhow::ensure!(admin == *context.sender(), "Only the admin can set the value.");

                // If the check passes, update the state.
                self.value.set(&new_value, state)?;
                Ok(())
            }
        }
    }
}
Step 3: Configure the Genesis State
Our genesis method reads the admin's address from a configuration file. We need to provide that value in configs/mock/genesis.json.
The SDK automatically deserializes this JSON into our ValueSetterConfig struct (since we plugged in said struct as the Config associated type of our module) when the rollup starts.
// In sov-rollup-starter/configs/mock/genesis.json
{
  // ... other module configs
  "value_setter": {
    "admin": "0x9b08ce57a93751aE790698A2C9ebc76A78F23E25"
  }
}
Previously, the value_setter field was null. Now, we've given it the data our module needs to initialize the admin address.
How is the Module Integrated?
You might be wondering how the rollup knows about the value-setter module in the first place. In the sov-rollup-starter, we've already "wired it up" for you to keep this quickstart focused on module logic.
For your own future modules, the process involves:
- Adding the module crate to the workspace in the root
Cargo.toml. - Adding it as a dependency to the core logic in
crates/stf/Cargo.toml. - Adding the module as a field on the
Runtimestruct incrates/stf/src/runtime.rs.
You can remove value-setter from these files to see what it's like to build and integrate a module from scratch.
Step 4: Build, Run, and Interact!
Now let's see your logic in action.
-
Build and Run the Rollup: From the root directory, start the rollup.
cargo run -
Query the Initial State: In another terminal, use
curlto check the initial value. It should benullbecause ourgenesismethod only sets theadmin, not thevalue.curl http://127.0.0.1:12346/modules/value-setter/state/value # Expected output: {"value":null} -
Submit a Transaction: Now, let's change the value. We'll edit the example js script in starter to call our module.
- Open the
examples/starter-js/src/index.tsfile. - The
signerin this script corresponds to theadminaddress we set ingenesis.json. - Find the
callMessagevariable and replace it with a call to yourvalue_settermodule.
// In sov-rollup-starter/examples/starter-js/src/index.ts // Replace the existing call message with this one: const callMessage: RuntimeCall = { value_setter: { // The module's name in the Runtime struct set_value: 99, // The CallMessage variant (in snake_case) and its new value }, };- Install js dependencies, and run the script to send the transaction:
# From the sov-rollup-starter/examples/starter-js directory npm install npm run start - Open the
-
Verify the Change: Now for the "Aha!" moment. Query the state again:
curl http://127.0.0.1:12346/modules/value-setter/state/value
# Expected output: {"value":99}
Congratulations! You have successfully written and interacted with your own custom logic on a Sovereign SDK rollup!
Building for Production
In the quickstart, you built a simple but functional module. Now we'll walk you
through the structure of a module in much more detail, taking the ValueSetter
as our example. In this section, we'll explain how to take better advantage of
many SDK features:
- Events: The primary mechanism for communicating with off-chain systems.
- Errors: Best practices for robust and user-friendly error reporting.
- Testing: Using the SDK's powerful testing framework to ensure correctness.
- Wallets and Accounts: A closer look at how users can interact with your applications.
- Advanced Features: Exploring powerful tools like hooks, custom APIs, and configurable delays.
- Performance Optimizations: How to ensure your module is efficient and scalable.
- Prebuilt Modules: How to leverage the ecosystem of existing modules to accelerate your development.
Let's begin.
Anatomy of a Module
As we begin our journey into building a production-ready rollup, the first step is to understand the two most important architectural concepts in the Sovereign SDK: the Runtime and its Modules.
Runtime vs. Modules
The runtime is the orchestrator of your rollup. It receives transactions, deserializes them, and routes them to the appropriate modules for execution. Think of it as the central nervous system that connects all your application logic. The Runtime struct you define in your rollup code specifies which modules are included.
Modules contain the actual business-logic. Each module manages its own state and defines the specific actions (called "call messages") that users can perform. Modules are usually small and self-contained, but they can contain dependencies on other modules when it makes sense to.
Now that we understand this high-level structure, let's dissect the ValueSetter module you built and enhance it with production-grade features.
Dissecting the ValueSetter Module
The Module Struct: State and Dependencies
First, let's look at the ValueSetter struct, which defined its state variables and its dependencies on other modules.
#[derive(Clone, ModuleInfo, ModuleRestApi)]
pub struct ValueSetter<S: Spec> {
    #[id]
    pub id: ModuleId,

    #[state]
    pub value: StateValue<u32>,

    #[state]
    pub admin: StateValue<S::Address>,
}
This struct is defined by several key attributes and the Spec generic:
#[derive(ModuleInfo)]: This derive macro is mandatory. It performs essential setup, like laying out your state values in the database.#[id]: Every module must have exactly one field with this attribute. The SDK uses it to store the module's unique, auto-generated identifier.#[state]: This attribute marks a field as a state variable that will be stored in the database. More on state management later.- The
SpecGeneric: All modules are generic over aSpec. This provides core types likeS::Addressand makes your module portable across things like DA layers, zkVMs, and address formats. #[module]: While not used in this example, this attribute declares a dependency on another module. For example, if ourValueSetterneeded to charge a fee, we could add#[module] pub bank: sov_bank::Bank<S>, allowing us to call methods likeself.bank.transfer(...)from our own logic.
The ModuleRestApi Trait
Deriving the ModuleRestApi trait is optional but highly recommended. It automatically generates RESTful API endpoints for the #[state] items in your module. Each item's endpoint will have the name {hostname}/modules/{module-name}/{field-name}/, with all items automatically converted to kebab-casing. For example, for the value field in our ValueSetter module, the SDK generates an endpoint at the path /modules/value-setter/value.
Note that ModuleRestApi can't always generate endpoints for you. If it can't figure out how to generate an endpoint for a particular state value, it will simply skip it by default. If you want to override this behavior and throw a compiler error if endpoint generation fails, you can add the #[rest_api(include)] attribute.
State Management In-Depth
The SDK provides several "state" types for different use cases. All three types of state can be added to your module struct using the #[state] attribute.
StateValue<T>: Stores a single item of typeT. We used this for thevalueandadminvariables in our example.StateMap<K, V>: Stores a key-value mapping. This is ideal for balances or other user-specific data.StateVec<T>: Stores an ordered list of items, accessible by index.
The generic types can be any (deterministically) serializable Rust data structure.
Accessory State: For each state type, there is a corresponding AccessoryState* variant (e.g., AccessoryStateMap). Accessory state is special: it can be read via the API, but it is write-only during transaction execution. This makes it a simple and cheap storage to use for data that doesn't affect onchain logic, like purchase histories for an off-chain frontend.
The Module Trait
The Module trait is where your business logic lives. Let's review the pieces you implemented for ValueSetter in the quickstart.
-
type Configandfn genesis(): You created aValueSetterConfigand used it in thegenesismethod to initialize theadminstate. This is a standard pattern:Configdefines the initial data, read fromgenesis.json, andgenesis()applies it to the module's state when the rollup is first deployed. -
type CallMessageandfn call(): You defined aCallMessageenum for the publicSetValueaction. This enum is the public API of your module, representing the actions a user can take. Thecall()method is the entry point for these actions. The runtime passes in theCallMessageand aContextcontaining metadata like the sender's address, which you used for the admin check. -
Error Handling: In your
callmethod, you usedanyhow::ensure!to handle a user error (an invalid sender). When acallmethod returns anErr, the SDK guarantees that all state changes are automatically reverted, ensuring atomicity. ThisResult-based approach is for predictable user errors, while unrecoverable system bugs should cause apanic!. A more detailed guide is available in theAdvanced Topicssection.
A Quick Tip on Parametrizing Your Types Over S
If you parameterize your
CallMessageorEventoverS(for example, to include an address of typeS::Address), you must add the#[schemars(bound = "S: Spec", rename = "MyEnum")]attribute on top your enum definition. This is a necessary hint forschemars, a library that generates a JSON schema for your module's API. It ensures that your generic types can be correctly represented for external tools.
Quick Tip: Handling
VectorandStringin CallMessageUse the fixed‑size wrappers
SafeVectorandSafeStringfor any fields that are deserialized directly into aCallMessage; they limit payload size and prevent DoS attacks. After deserialization, feel free to convert them to regularVectorandStringvalues and use them as usual.
Adding Events
Your ValueSetter module works, but it's a "black box." Off-chain applications have no way of knowing when the value changes without constantly polling the API. To solve this, we introduce Events.
Events are the primary mechanism for streaming on-chain data to off-chain systems like indexers and front-ends in real-time. Let's add one to our module.
First, define an Event enum.
// In examples/value-setter/src/lib.rs

#[derive(Clone, Debug, PartialEq, Eq, JsonSchema)]
#[serialize(Borsh, Serde)]
#[serde(rename_all = "snake_case")]
pub enum Event {
    ValueUpdated(u32),
}
Next, update your Module implementation to use this new Event type and emit it from the call method.
// In examples/value-setter/src/lib.rs

impl<S: Spec> Module for ValueSetter<S> {
    type Spec = S;
    type Config = ValueSetterConfig<S>;
    type CallMessage = CallMessage;
    type Event = Event; // Change this from ()
    type Error = anyhow::Error;

    // The `genesis` method is unchanged.
    fn genesis(&mut self, _header: &<S::Da as sov_modules_api::DaSpec>::BlockHeader, config: &Self::Config, state: &mut impl GenesisState<S>) -> Result<()> {
        // ...
    }

    fn call(&mut self, msg: Self::CallMessage, context: &Context<S>, state: &mut impl TxState<S>) -> Result<(), Self::Error> {
        match msg {
            CallMessage::SetValue(new_value) => {
                let admin = self.admin.get(state)??;
                anyhow::ensure!(admin == *context.sender(), "Only the admin can set the value.");

                self.value.set(&new_value, state)?;

                // NEW: Emit an event to record this change.
                self.emit_event(state, Event::ValueUpdated(new_value));

                Ok(())
            }
        }
    }
}
Now, whenever the admin successfully calls set_value, the module will emit a ValueUpdated event.
A key guarantee of the Sovereign SDK is that event emission is atomic with transaction execution—if a transaction reverts, so do its events. This ensures any off-chain system remains consistent with the on-chain state.
To make it simple to build scalable and faul-tolertant off-chain data pipelines, the sequencer provides a websocket endpoint that streams sequentially numbered transactions along with their corresponding events. If a client disconnects, it can reliably resume the stream from the last transaction it processed.
Module Error Handling
So far, your module uses anyhow::Error for error handling, which is simple but not very robust. For a production-ready module, it's better to define a custom error enum that clearly communicates the different failure modes of your module as well as includes structured error context which makes it easier for client-side applications to handle errors.
Here's how you can define a custom error enum for the ValueSetter module:
use sov_modules_api::{ErrorDetail, ErrorContext, err_detail};

#[derive(Debug, thiserror::Error, serde::Serialize)]
#[serde(tag = "error_code", rename_all = "snake_case")]
pub enum ValueSetterError {
    // So we can still wrap anyhow::Error for unexpected errors
    // State getters/setters often use anyhow
    #[error(transparent)]
    Any(#[from] anyhow::Error),
    #[error("User '{sender}' is unauthorized, only the admin can set the value.")]
    Unauthorized {
        sender: String,
    },
}

impl sov_modules_api::ErrorDetail for ValueSetterError {
    fn error_detail(&self) -> Result<ErrorContext, Box<dyn std::error::Error + Send + Sync>> {
        let mut detail = err_detail!(self); // Serializes `ValueSetterError` to a JSON object
        detail.insert("message".to_owned(), self.to_string().into());
        Ok(detail)
    }

}
Quick Tip: ErrorDetail trait
The
ErrorDetailtrait controls how the error is returned from the REST API to clients. We use thetagattribute to implement error codes for our module then useerr_detail!to serialize the error to a JSON object. Finally , we add a human-readablemessagefield to the error context to enable showing a summarized message to users.
Then, update your Module implementation to use this new error type:
impl<S: Spec> Module for ValueSetter<S> {
    type Spec = S;
    type Config = ValueSetterConfig<S>;
    type CallMessage = CallMessage;
    type Event = Event;
    type Error = ValueSetterError; // Use the custom error type

    // The `genesis` method is unchanged.
    fn genesis(&mut self, _header: &<S::Da as sov_modules_api::DaSpec>::BlockHeader, config: &Self::Config, state: &mut impl GenesisState<S>) -> Result<()> {
        // ...
    }

    fn call(&mut self, msg: Self::CallMessage, context: &Context<S>, state: &mut impl TxState<S>) -> Result<(), Self::Error> {
        match msg {
            CallMessage::SetValue(new_value) => {
                let admin = self.admin.get(state)??;

                if admin != *context.sender() {
                    // NEW: Return a structured Unauthorized error
                    return Err(ValueSetterError::Unauthorized {
                        sender: context.sender().to_string(),
                    });
                }

                self.value.set(&new_value, state)?;

                self.emit_event(state, Event::ValueUpdated(new_value));

                Ok(())
            }
        }
    }
}
Now when a submitted transaction fails because the sender is not the admin, it will return your ErrorDetails in the details field of the error response, like this:
{
  "error": {
    "message": "Transaction execution unsuccessful",
    "status": 400,
    "details": {
        "error_code": "unauthorized",
        "sender": "0x1234...abcd",
        "message": "User '0x1234...abcd' is unauthorized, only the admin can set the value."
    }
  }
}
Next Step: Ensuring Correctness
You now have a strong conceptual understanding of how a Sovereign SDK module is structured.
In the next chapter, "Testing Your Module," we'll show you how to test your modules.
Testing Your Module
In this section, we'll walk you through writing tests for the ValueSetter module you've been working on. The Sovereign SDK provides a powerful testing framework in the sov-test-utils crate that allows you to test your module's logic in an isolated environment, without needing to run a full rollup.
Step 1: Setting Up the Test Environment
All module tests follow a similar pattern. First, we need to create a temporary, isolated runtime that includes our module. Then, for each test, we'll define the initial ("genesis") state and use a TestRunner to execute transactions and make assertions.
Let's build a setup helper function to handle this boilerplate.
a) Create a Test Runtime
The first thing we need is a runtime to test against. The generate_optimistic_runtime! macro creates a temporary runtime that includes your ValueSetter module alongside the core modules (like the Bank) needed for a functioning rollup.
// Typically in tests/test_value_setter.rs
use sov_modules_api::Spec;
use sov_test_utils::{generate_optimistic_runtime, TestSpec};
use value_setter::{ValueSetter, ValueSetterConfig};

type S = TestSpec;

// This macro creates a temporary runtime for testing.
generate_optimistic_runtime!(
    TestRuntime <=
    value_setter: ValueSetter<S>
);
b) Create a setup Helper
To avoid repeating code in every test, we'll create a setup function. This function will be responsible for creating test users, configuring the initial state of the rollup (the genesis state), and initializing the TestRunner that we'll use to drive the tests.
use sov_test_utils::runtime::genesis::optimistic::HighLevelOptimisticGenesisConfig;
use sov_test_utils::runtime::TestRunner;
use sov_test_utils::TestUser;

// A helper struct to hold our test users, for convenience.
pub struct TestData<S: Spec> {
    pub admin: TestUser<S>,
    pub regular_user: TestUser<S>,
}

pub fn setup() -> (TestData<S>, TestRunner<TestRuntime<S>, S>) {
    // Create two users, the first of which will be our admin.
    // (The `HighLevelOptimisticGenesisConfig` builder is a convenient way
    // to set up the initial state for core modules.)
    let genesis_config = HighLevelOptimisticGenesisConfig::generate()
        .add_accounts_with_default_balance(2);

    let mut users = genesis_config.additional_accounts().to_vec();
    let regular_user = users.pop().unwrap();
    let admin = users.pop().unwrap();

    let test_data = TestData {
        admin: admin.clone(),
        regular_user,
    };

    // Configure the genesis state for our ValueSetter module.
    let value_setter_config = ValueSetterConfig {
        admin: admin.address(),
    };

    // Build the final genesis config by combining
    // the core config with our module's specific config.
    let genesis = GenesisConfig::from_minimal_config(
        genesis_config.into(),
        value_setter_config,
    );

    // Initialize the TestRunner with the genesis state.
    // The runner gives us a simple way to execute transactions and query state.
    let runner = TestRunner::new_with_genesis(
        genesis.into_genesis_params(),
        TestRuntime::default(),
    );

    (test_data, runner)
}
This setup function now gives us a freshly initialized test environment for every test case, with our admin and a regular_user ready to go.
Step 2: Writing a "Happy Path" Test
Now, let's write our first test to ensure the admin can successfully set the value. We use a TransactionTestCase to bundle the transaction input with a set of assertions to run after execution.
use sov_test_utils::{AsUser, TransactionTestCase};
use value_setter::{CallMessage, Event};

#[test]
fn test_admin_can_set_value() {
    // 1. Setup
    let (test_data, mut runner) = setup();
    let admin = &test_data.admin;

    let new_value = 42;

    // 2. Execute the transaction
    runner.execute_transaction(TransactionTestCase {
        // The transaction input, created by the admin user.
        input: admin.create_plain_message::<TestRuntime<S>, ValueSetter<S>>(
            CallMessage::SetValue(new_value),
        ),
        // The assertions to run after execution.
        assert: Box::new(move |result, state| {
            // 3. Assert the outcome
            assert!(result.tx_receipt.is_successful());

            // Assert that the correct event was emitted.
            assert_eq!(result.events.len(), 1);
            let event = &result.events[0];
            // Note: The event enum name (`TestRuntimeEvent`) is auto-generated by our `generate_optimistic_runtime!` macro.
            assert_eq!(
                event,
                &TestRuntimeEvent::ValueSetter(Event::ValueUpdated(new_value))
            );

            // Assert that the state was updated correctly by querying the module.
            let value_setter = ValueSetter::<S>::default();
            let current_value = value_setter.value.get(state).unwrap();
            assert_eq!(current_value, Some(new_value));
        }),
    });
}
Step 3: Testing a Failure Case
It's equally important to test that our module fails when it should. Let's add a test to ensure a regular user cannot set the value.
#[test]
fn test_regular_user_cannot_set_value() {
    // 1. Setup
    let (test_data, mut runner) = setup();
    let regular_user = &test_data.regular_user;

    // 2. Execute the transaction from the non-admin user
    runner.execute_transaction(TransactionTestCase {
        // This time we're sending the transaction from the regular_user
        input: regular_user.create_plain_message::<TestRuntime<S>, ValueSetter<S>>(
            CallMessage::SetValue(99),
        ),
        assert: Box::new(move |result, state| {
            // 3. Assert that the transaction was reverted
            assert!(result.tx_receipt.is_reverted());

            // Optional: Check for the specific error message
            if let sov_modules_api::TxEffect::Reverted(err) = result.tx_receipt {
                assert!(err.reason.to_string().contains("Only the admin can set the value."));
            }

            // Assert that the state was NOT changed.
            let value_setter = ValueSetter::<S>::default();
            let current_value = value_setter.value.get(state).unwrap();
            assert_eq!(current_value, None); // It should remain un-set.
        }),
    });
}
Step 4: Running Your Tests
Execute your tests from your module's root directory using the standard Cargo command:
cargo test
Additional Testing Capabilities
The TestRunner provides methods for more advanced scenarios, all documented in the sov-test-utils crate. Key capabilities include:
- Batch Execution: Execute and assert on a sequence of transactions with
runner.execute_batch(...). - Time Advancement: Test time-sensitive logic (like in
Hooks) by advancing the slot count withrunner.advance_slots(...). - Historical Queries: Query state at a specific block height with
runner.query_state_at_height(...). - API Testing: Run an integrated REST API server for off-chain testing with
runner.query_api_response(...).
What's Next?
With a thoroughly tested module, you can be confident that your on-chain logic is correct. The next step is to understand how users will interact with it from the outside world.
In the next chapter, "Wallets and Accounts," we'll take a closer look at how users create accounts, sign transactions, and submit them to your rollup.
Wallets and Accounts
This section covers how accounts are created, which wallets are supported, and how transactions are signed in the Sovereign SDK. In the quickstart, you already submitted a transaction using an example js script; now, we'll explore the concepts behind that interaction.
The core design principle is Ethereum wallet compatibility. Sovereign SDK rollups use standard Ethereum addresses and signatures (Secp256k1), and provide compatibility with many popular wallets. However, there are some important nuances to understand.
The Sovereign SDK Transaction Type
A critical distinction to grasp is that while addresses and signatures are Ethereum-compatible, the transaction format itself is unique to your rollup. A Sovereign SDK rollup does not natively accept standard Ethereum transactions.
Instead, your rollup's Runtime defines a custom RuntimeCall enum in Rust, which represents all possible actions a user can take. When a user sends a transaction, they are sending a signed message that contains this RuntimeCall. Remember the call object you created in the quickstart?
// From the quickstart's examples/starter-js/src/index.ts
const call = {
    value_setter: {
        set_value: 99,
    },
};
This JavaScript object is a direct representation of a RuntimeCall variant. The Sovereign web3.js library takes this object, serializes it into a compact binary format, and then uses a signer to sign the hash of that data.
Signing Transactions Today: The web3.js SDK & Privy
The primary way for users and developers to sign and submit these custom transactions today is through the Sovereign web3.js client library. This library provides two main signer implementations:
1. Secp256k1Signer (For Developers)
This is a straightforward signer for programmatic use where you have direct access to a raw private key. It's perfect for scripting, backend services, or testing. The script you used in the quickstart uses this signer behind the scenes, with the private key pre-configured to match the admin address from your genesis.json.
import { Secp256k1Signer } from "@sovereign-labs/signers";

// Initialize with a raw private key
const privKey = "0d87c12ea7c12024b3f70a26d735874608f17c8bce2b48e6fe87389310191264";
const signer = new Secp256k1Signer(privKey);

// Use the signer to send a transaction
await rollup.call(callMessage, { signer });
2. PrivySigner (For User-Facing Applications)
For most applications, asking users for a private key is not feasible or secure. This is where Privy comes in. Privy is a powerful wallet-as-a-service provider that allows users to create a non-custodial wallet using familiar Web2 logins like email or social accounts. They can also connect their existing wallets (like MetaMask or Phantom).
The sov-rollup-starter repository includes a full example of integrating the PrivySigner, making it the most realistic and user-friendly way to onboard users to your rollup today. It handles all the complexity of wallet creation and signing, allowing users to interact with your application seamlessly.
The Future: Supporting All Ethereum Wallets by Leveraging EIP-712
While Privy provides an excellent experience, it is crucial to meet users where they're at and enable support for all existing Ethereum wallets (including hardware wallets). This will be enabled by implementing a new EIP-712 Authenticator for the Sovereign SDK runtime (which we hope to complete by August 24, 2025).
EIP-712 is an Ethereum standard for signing typed, structured data. Instead of asking the user to sign a cryptic hash, EIP-712 allows wallets to display the transaction data in a human-readable, key-value format. This dramatically improves security and user experience, as users can see exactly what they are approving.
For example, a signature request using EIP-712 would look like this in MetaMask:
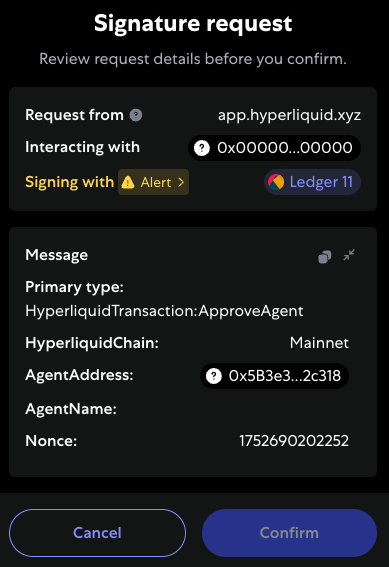
This upcoming feature, inspired by the pioneering work of Hyperliquid, will allow developers to support all Ethereum wallets.
Next Steps: Advanced Features
You now have a complete picture of how to build a module and enable users to interact with it.
In the next chapter, "Advanced Topics," you'll learn about hooks, custom APIs, and other powerful features that will allow you to build complex onchain applications.
Advanced Topics
This section covers advanced module development features that go beyond basic functionality.
Need to run logic on every block? Want to build custom APIs or integrate with off-chain services? Need configurable delays to reduce MEV for your application? You'll find the answers here.
Each of these features is optional, designed to be adopted as your application's needs evolve.
Hooks: Responding to On-Chain Events
While the call method allows your module to react to direct user transactions, sometimes
you need your module to execute logic in response to broader onchain events. This is where Hooks come in.
They allow your module to "hook into" the lifecycle of a block or transaction, enabling
powerful automation.
BlockHooks: Running Logic at Block Boundaries
BlockHooks are triggered at the beginning and end of every block. They are ideal for logic that
needs to run periodically, independent of any specific transaction. For example, you could use
a BlockHook to:
- Distribute rewards once per block.
- Update funding rate looking at the number of open positions at the end of every N blocks.
A word of caution: BlockHook computation is not paid for by any single user, so it's a "public good" of your rollup. Be mindful of performance here; heavy computation in a BlockHook can make your rollup vulnerable to Denial-of-Service (DoS) attacks.
TxHooks: Monitoring All Transactions
TxHooks run before and after every single transaction processed by the rollup. This makes them perfect for:
- Global Invariant Checks: Ensuring a global property (like total supply of a token) is never violated by any module.
- Monitoring and Reactions: Allowing a compliance module to monitor all transfers and flag suspicious activity.
Unlike BlockHooks, the gas for TxHooks is paid by the user who submitted the transaction.
FinalizeHook: Simple Off-Chain Indexing
The FinalizeHook runs at the very end of a block's execution and can only write to AccessoryState. This makes it
cheap to run and very simple for storing data that are only meant to be read by off-chain APIs, not used by on-chain logic.
Note: FinalizeHook with AccessoryState works for basic indexing, but for a scalable, long‑term solution we recommend
the transactions WebSocket endpoint, which emits events and lets you subscribe from any transaction number. Stream those
events into a horizontally scalable store such as Postgres or a platform like Kafka Streams.
Implementing Hooks
To use a hook, you simply import the corresponding trait from sov_modules_api and implement it for your module. The SDK automatically detects this implementation and will call the appropriate methods at the correct time during block processing.
Example: Implementing BlockHooks
To run logic at the beginning of each block, import the BlockHooks trait and implement it for your module:
use sov_modules_api::{BlockHooks, Spec, StateCheckpoint};
// ... other imports

impl<S: Spec> BlockHooks for MyModule<S> {
    type Spec = S;

    // This method will be called at the beginning of every block.
    fn begin_rollup_block_hook(
        &mut self,
        _pre_state_user_root: &<S::Storage as Storage>::Root,
        _state: &mut StateCheckpoint<S>,
    ) {
        // Your custom logic here...
    }
}
Note: Since the FinalizeHook only runs natively, it should be implemented under the native flag. More on that later.
Error Handling: User Errors vs. System Bugs
In a blockchain context, handling failure correctly is critical. Your module must clearly distinguish between two types of failures: expected user errors (which should gracefully revert a transaction) and unexpected system bugs (which may require halting the chain to prevent state corruption). The Sovereign SDK provides a clear pattern for this distinction.
1. User Errors: Returning anyhow::Result
For all expected, business-logic-level failures, your call method should return an Err containing an anyhow::Error. These are the errors you anticipate, such as a user attempting to transfer more tokens than they own, calling a method without the proper permissions, or providing invalid parameters.
When you return an Err, the SDK automatically reverts all state changes from the transaction. The goal is to safely reject the invalid transaction while providing a clear error message to the user and developer.
The anyhow crate provides several convenient macros for this. While you can always construct an error with anyhow::anyhow!(), the bail! and ensure! macros are generally preferred for their conciseness.
bail!(message): Immediately returns anErr. It's a direct shortcut forreturn Err(anyhow::anyhow!(message)).ensure!(condition, message): Checks a condition. If it's false, it returns anErrwith the given message. This is perfect for validating inputs and permissions at the start of a function.
Here’s how they look in practice, using the Bank module as an example:
// From the Bank module's `create_token` method
fn create_token(
    // ...
) -> Result<TokenId> {
    // Using `ensure!` to validate an input parameter.
    anyhow::ensure!(
        token_decimals <= MAX_DECIMALS,
        "Too many decimal places."
    );

    // Using `bail!` to return an error after a more complex check.
    if initial_balance > supply_cap {
        bail!(
            "Initial balance {} is greater than the supply cap {}",
            initial_balance,
            supply_cap
        );
    }
    // ...
    Ok(token_id)
}
Note: Because transaction reverts are a normal part of operation, they should be logged at a debug level if necessary, not as warnings or errors.
2. System Bugs: panic!
A panic! is an emergency stop. It should only be used for critical, unrecoverable bugs where a core assumption or invariant of your system has been violated.
- When: An impossible state is reached (e.g., total supply becomes negative).
- What it does: Shuts down the rollup node to prevent state corruption.
- Goal: Alert the node operator to a critical software bug that needs immediate attention.
Use panic! as your last line of defense. It signals that your module's integrity is compromised and continuing execution would be dangerous.
Node-Side Logic with Native Features
A crucial architectural concept in the Sovereign SDK is the distinction between logic that is part of the verifiable state transition and logic that only runs natively on the full node or sequencer. The former must be deterministic and provable in a zkVM, while the latter is used for off-chain tooling like APIs, metrics, and transaction scheduling.
The native Feature Flag
Any code that is not part of the core state transition must be gated with #[cfg(feature = "native")]:
#[cfg(feature = "native")]
impl<S: Spec> MyModule<S> {
    // This code only compiles natively, not in zkVM
    pub fn debug_state(&self, state: &impl StateAccessor<S>) {
        // ...
    }
}
This ensures that your zk-proofs remain small and your onchain logic remains deterministic. Common use cases for native-only code include:
- Custom REST APIs and RPC methods
- Metrics and logging integration
- Debugging tools
- Integrations with external services
Adding Custom REST APIs
You can easily add custom APIs to your module by implementing the HasCustomRestApi trait. This trait has two methods - one which actually implements the routes, and an optional one which provides an OpenApi spec. You can see a good example in the Bank module:
#![cfg(feature = "native")]
impl<S: Spec> HasCustomRestApi for Bank<S> {
    type Spec = S;

    fn custom_rest_api(&self, state: ApiState<S>) -> axum::Router<()> {
        axum::Router::new()
            .route(
                "/tokens/:tokenId/total-supply",
                get(Self::route_total_supply),
            )
            .with_state(state.with(self.clone()))
    }

    fn custom_openapi_spec(&self) -> Option<OpenApi> {
        let mut open_api: OpenApi =
            serde_yaml::from_str(include_str!("../openapi-v3.yaml")).expect("Invalid OpenAPI spec");
        for path_item in open_api.paths.paths.values_mut() {
            path_item.extensions = None;
        }
        Some(open_api)
    }
}

async fn route_balance(
    state: ApiState<S, Self>,
    mut accessor: ApiStateAccessor<S>,
    Path((token_id, user_address)): Path<(TokenId, S::Address)>,
) -> ApiResult<Coins> {
    let amount = state
        .get_balance_of(&user_address, token_id, &mut accessor)
        .unwrap_infallible() // State access can't fail because no one has to pay for gas.
        .ok_or_else(|| errors::not_found_404("Balance", user_address))?;

    Ok(Coins { amount, token_id }.into())
}
REST API methods get access to an ApiStateAccessor. This accessor provides a read-only view of the latest committed state. While it allows you to call state mutation methods (e.g., set, delete), these changes are temporary and are discarded at the end of the request. This design allows you to reuse view-logic from your module without the risk of accidentally modifying persistent state.
If you implement a custom REST API, your new routes will be automatically nested under your module's router. So, in the following example, the tokens/:tokenId/total-supply function can be found at /modules/bank/tokens/:tokenId/total-supply. Similarly, your OpenApi spec will get combined with the auto-generated one automatically.
Note that for for custom REST APIs, you'll need to manually write an OpenApi specification if you want client support.
Adding Legacy RPC Support
In addition to custom RESTful APIs, the Sovereign SDK lets you create JSON-RPC methods. This is useful to provide API compatibility with existing chains like Ethereum and Solana, but we recommend using REST APIs whenever compatibility isn't a concern.
To implement RPC methods, simply annotate an impl block on your module with the #[rpc_gen(client, server)] macro, and then write methods which accept an ApiStateAcessor as their final argument and return an RpcResult. You can see some examples in the Evm module.
#![cfg(feature = "native")]
#[rpc_gen(client, server)]
impl<S: Spec> Evm<S> {
    /// Handler for `net_version`
    #[rpc_method(name = "eth_getStorageAt")]
    pub fn get_storage_at(
        &self,
        address: Address,
        index: U256,
        state: &mut ApiStateAccessor<S>,
    ) -> RpcResult<U256> {
        let storage_slot = self
            .account_storage
            .get(&(&address, &index), state)
            .unwrap_infallible()
            .unwrap_or_default();
        Ok(storage_slot)
    }
}
Transaction Scheduling for MEV Mitigation
For latency-sensitive financial applications, managing transaction order and mitigating Maximum Extractable Value (MEV) is critical. The Sovereign SDK provides a powerful, sequencer-level tool to combat toxic orderflow by allowing developers to introduce fine-grained processing delays for specific transaction types.
This is a powerful technique for applications like on-chain Central Limit Orderbooks (CLOBs). By introducing a small, artificial delay on aggressive "take" orders, a rollup can implicitly prioritize "cancel" orders. This gives market makers a crucial window to pull stale quotes before they can be exploited by low-latency arbitrageurs, leading to fairer and more liquid markets.
This functionality is implemented via the get_transaction_delay_ms method on your Runtime struct. Because this is a sequencer-level scheduling feature and not part of the core state transition logic, it must be gated behind the native feature flag.
The method receives a decoded CallMessage and returns the number of milliseconds the sequencer should wait before processing it. A return value of 0 means the transaction should be processed immediately.
Example: Prioritizing Cancels in a CLOB
// In your-rollup/stf/src/runtime.rs

// In the `impl<S> sov_modules_stf_blueprint::Runtime<S> for Runtime<S>` block:

#[cfg(feature = "native")]
fn get_transaction_delay_ms(&self, call: &Self::Decodable) -> u64 {
    // `Self::Decodable` is the auto-generated `RuntimeCall` enum for your runtime.
    // It has one variant for each module in your `Runtime` struct.
    match call {
        // Introduce a small 50ms delay on all "take" orders to give
        // market makers time to cancel stale orders.
        // (Here, `Clob` is the variant corresponding to the `clob` field in your `Runtime` struct,
        // and `PlaceTakeOrder` is the variant of the `clob` module's `CallMessage` enum.)
        Self::Decodable::Clob(clob::CallMessage::PlaceTakeOrder { .. }) => 50,

        // All other CLOB operations, like placing or cancelling "make" orders,
        // are processed immediately with zero delay.
        Self::Decodable::Clob(..) => 0,

        // All other transactions in other modules are also processed immediately.
        _ => 0,
    }
}
This feature gives you precise control over your sequencer's processing queue, enabling sophisticated MEV mitigation strategies without altering your onchain business logic.
Mastering Your Module
With a solid grasp of module implementation, it's time to focus on performance. The next chapter, "Understanding Performance," dives into the key considerations for building a fast and efficient rollup.
Understanding Performance
The performance of your modules directly impacts your rollup's throughput, latency, and user transaction costs. While the SDK handles many optimizations automatically, your design choices—especially regarding state accesses and cryptography—are the biggest levers you have.
State Access: The Golden Rule is to Minimize Distinct Accesses
The Problem: Every State Access Has a High Fixed Cost
The vast majority of the cost of executing a transaction comes from state accesses. Each time you call .get() or .set() on a distinct state item for the first time in a block (a "cold" access), the SDK must generate a Merkle proof for that item. This proof is required by the ZK-prover to verify that the data is part of the correct state root. Generating these proofs is expensive.
Accessing a value that has already been touched in the current block (a "hot" access) is much cheaper because the proof has already been generated and cached.
The Solution: Bundle Related Data
The most effective optimization is to group data that is frequently read or written together into a single StateValue.
Consider a user profile module. A naive implementation might look like this:
// ANTI-PATTERN: Separated state items
#[state]
pub usernames: StateMap<S::Address, String>,
#[state]
pub bios: StateMap<S::Address, String>,
#[state]
pub follower_counts: StateMap<S::Address, u64>,
Loading a single user's profile would require three distinct (and expensive) state accesses. A much better approach is to bundle the data:
// GOOD PATTERN: Bundled state
pub struct ProfileData {
    pub username: String,
    pub bio: String,
    pub follower_count: u64,
}

#[state]
pub profiles: StateMap<S::Address, ProfileData>,
Now, loading a profile requires only one state access.
The Trade-off: This bundling increases the size of the value being read from storage, but it saves the massive fixed cost of generating a new Merkle proof for a separate state access. This trade-off is almost always worth it.
While precise numbers can change with SDK updates, the cost of reading even a few hundred extra bytes is negligible compared to the cost of a distinct "cold" state access. Therefore, the guiding principle is: if data items have a reasonable probability of being used together, you should bundle them. If two items are always accessed together, they should always be in the same state item, regardless of size.
Cryptography: Use ZK-Optimized Implementations
The Problem: General-Purpose Crypto is Slow to Prove
The other common source of performance issues is heavy-duty cryptography. Many standard Rust crypto libraries are not optimized for ZK environments and can be extremely slow to prove, creating a bottleneck that limits your rollup's throughput.
The Solution Hierarchy:
- Preferred: Use the implementations provided by the
Spec::CryptoSpecassociated type. These are guaranteed to be selected for their ZK-friendly performance. - If you must use an external library: Be aware of the potential for a severe performance penalty during proof generation.
- For advanced, specialized needs: Consider using a library tailored to a specific ZKVM (like
SP1orRisc0). This will give you better performance but will tie your module to that specific proving system.
Next up: Prebuilt Modules
Building custom modules is powerful, but you don't always have to start from scratch. The next chapter introduces the SDK's "Prebuilt Modules," which provide ready-to-use solutions for common tasks like token management and bridging.
Prebuilt Modules
The SDK provides a large suite of prebuilt, well-maintained modules that handle common blockchain primitives. Leveraging these modules allows you to focus on your application's unique logic instead of reinventing the wheel.
This page serves as a reference guide to the standard modules included with the SDK.
| Module | Crate Link | Description |
|---|---|---|
| User-Facing | Modules that directly provide user-facing application logic. | |
| Bank | sov-bank | Creates and manages fungible tokens. Handles minting, transfers, and burning. |
| Paymaster | sov-paymaster | Enables gas sponsorship (meta-transactions), allowing users to transact without needing to hold gas tokens. |
| Chain State | sov-chain-state | Provides on-chain access to block metadata like the current block height and hash. |
| EVM | sov-evm | An EVM compatibility layer that executes standard, RLP-encoded Ethereum transactions. |
| SVM | sov-svm | A Solana VM compatibility layer that executes standard Solana transactions (maintained by the Termina team). |
| Core Infrastructure | Modules that provide fundamental, system-level capabilities. | |
| Accounts | sov-accounts | Manages user accounts, public keys, and nonces. |
| Uniqueness | sov-uniqueness | Provides transaction deduplication logic using either nonces (Ethereum-style) or generation numbers (for low-latency applications). |
| Blob Storage | sov-blob-storage | A deferred blob storage system that enables soft-confirmations without losing censorship resistance. |
| Bridging | Modules for interoperability with other blockchains. | |
| Hyperlane Bridge | sov-hyperlane-mailbox | An integration with the Hyperlane interoperability protocol, enabling messaging and token bridging to other blockchains (EVM, SVM, Cosmos). |
| Rollup Economics | Modules for managing incentives and fee distribution. | |
| Sequencer Registry | sov-sequencer-registry | Manages sequencer registration, bonding, and rewards distribution (for decentralized sequencing). |
| Prover Incentives | sov-prover-incentives | Manages prover registration, proof validation, and rewards distribution. |
| Attester Incentives | sov-attester-incentives | Manages the attestation/challenge process for optimistic rollups, including bonding and rewards. |
| Revenue Share | sov-revenue-share | Automates on-chain fee sharing for the use of premium SDK components, such as the low-latency sequencer. |
| Development & Testing | Helper modules for the development and testing lifecycle. | |
| Value Setter | sov-value-setter | A minimal example module used throughout the documentation for teaching purposes. |
| Synthetic Load | sov-synthetic-load | A utility module for generating heavy transactions to assist with performance testing and benchmarking. |
| Module Template | module-template | A starter template demonstrating best practices for module structure, including state, calls, and events. |
Next Steps
In the next section, "Additional Capabilities," you'll get a high-level overview of these features and how we can help you integrate them.
Additional Capabilities
The Sovereign SDK includes many advanced features beyond the core functionality covered in this documentation. The features listed in this section are already available or very near completion, but are not yet comprehensively documented.
To learn more about implementing these features in your rollup, just shoot us a message in our support channel or fill out our partner form and we'll reach out to you.
Performance & Reliability
- Automatic sequencer fail-over – Seamless failover across data centers ensures your soft-confirmations survive even the worst outages
- Intra-block caching – Cache state that's repeatedly accessed throughout a block, eliminating redundant instantiation per transaction and significantly boosting performance
- Dev-Ops tooling – Production-ready observability and deployment tools
Integrations & Compatibility
- Ethereum or Solana addresses and wallet support – Use any address format or wallet you prefer
- Hyperlane integration – Bridge liquidity from any EVM, SVM (Solana-like), or Cosmos SDK chain
- Multiple zkVM integrations – Choose the ZK-prover that best suits your application's performance characteristics, with support for Risc0, SP1, and other Rust-compatible ZKVMs.
We're happy to help you leverage these features to build production-ready rollups tailored to your exact requirements.
Instrumenting Your Rollup
Proper instrumentation is essential for monitoring, debugging, and optimizing your rollup in production. The Sovereign SDK provides comprehensive observability tools that help you understand your rollup's behavior and performance.
Getting Started with Observability
The rollup starter repository includes a complete observability stack that gives you instant visibility into your rollup. With a single command, you can spin up a local monitoring environment:
$ make start-obs
...
Waiting for all services to become healthy...
⏳ Waiting for services... (45 seconds remaining)
✅ All observability services are healthy!
🚀 Observability stack is ready:
   - Grafana:     http://localhost:3000 (admin/admin123)
   - InfluxDB:    http://localhost:8086 (admin/admin123)
This command starts all necessary Docker containers and automatically provisions Grafana dashboards specifically designed for rollups. You'll immediately see key metrics like block production rate, transaction throughput, and system performance.
To stop the observability stack:
make stop-obs
For production deployments and advanced configuration, check out our Observability Tutorial.
Adding Custom Instrumentation
While the default dashboards provide excellent baseline monitoring, every rollup has unique requirements. You'll want to add custom instrumentation to track:
- Application-specific metrics (e.g., DEX trading volume, NFT mints)
- Performance bottlenecks in your custom modules
This section will teach you how to:
- Add Custom Metrics - Track performance indicators and business metrics using the SDK's metrics framework
- Implement Structured Logging - Debug and monitor your rollup's execution with contextual logs
Important: Native-Only Features
All instrumentation code must be gated with #[cfg(feature = "native")] to ensure it only runs on full nodes, not in the zkVM during proof generation. This critical distinction allows you to instrument generously without affecting proof generation performance or determinism.
Let's dive into the specifics of adding metrics and logging to your rollup.
Metrics
The SDK includes a custom metrics system called sov-metrics designed specifically for rollup monitoring. It uses the Telegraf line protocol format and integrates with Telegraf through socket listeners for efficient data collection. Metrics are automatically timestamped and sent to your configured Telegraf endpoint, which typically forwards them to InfluxDB for storage and Grafana for visualization. Metrics can only be tracked in native mode (not in zkVM).
Important: Metrics are emitted immediately when tracked and are NOT rolled back if a transaction reverts. This means failed transactions will still have their metrics recorded, which can be useful for debugging and monitoring error rates.
Basic Example
#[cfg(feature = "native")]
use sov_metrics::{track_metrics, start_timer, save_elapsed};

impl<S: Spec> MyModule<S> {
    fn process_batch(&self, items: Vec<Item>) -> Result<()> {
        // Time the operation using the provided macros
        start_timer!(batch_timer);

        for item in items {
            self.process_item(item)?;
        }

        save_elapsed!(elapsed SINCE batch_timer);

        #[cfg(feature = "native")]
        {
            // Track batch size
            track_metrics(|tracker| {
                tracker.submit_inline(
                    "mymodule_batch_size",
                    format!("items={}", items.len()),
                );
            });

            // Track processing time
            track_metrics(|tracker| {
                tracker.submit_inline(
                    "mymodule_batch_processing_time",
                    format!("duration_ms={}", elapsed.as_millis()),
                );
            });
        }

        Ok(())
    }
}
Tracking Custom Metrics
To track custom metrics, implement the Metric trait:
// Implement your custom metric in a file of your own choosing...
#![cfg(feature = "native")]
use sov_metrics::Metric;
use sov_metrics::{track_metrics, start_timer, save_elapsed};
use std::io::Write;

#[derive(Debug)]
struct TransferMetric {
    from: String,
    to: String,
    token_id: TokenId,
    amount: u64,
    duration_ms: u64,
}

impl Metric for TransferMetric {
    fn measurement_name(&self) -> &'static str {
        "mymodule_transfers"
    }

    fn serialize_for_telegraf(&self, buffer: &mut Vec<u8>) -> std::io::Result<()> {
        // Format: measurement_name,tag1=value1,tag2=value2 field1=value1,field2=value2
        write!(
            buffer,
            "{},from={},to={},token_id={} amount={},duration_ms={}",
            self.measurement_name(),
            self.from,
            self.to,
            self.token_id,
            self.amount,
            self.duration_ms
        )
    }
}

// In your module file...
#[cfg(feature = "native")]
use sov_metrics::{track_metrics, start_timer, save_elapsed};
#[cfg(feature = "native")]
use my_custom_metrics::TransferMetric;

// Adapted from Bank module
impl<S: Spec> Bank<S> {
    fn transfer(&self, from: &S::Address, to: &S::Address, token_id: &TokenId, amount: u64, state: &mut impl TxState<S>) -> Result<()> {

        start_timer!(transfer_timer);

        // Perform the transfer
        self.do_transfer(from, to, token_id, amount, state)?;

        save_elapsed!(elapsed SINCE transfer_timer);

        #[cfg(feature = "native")]
        {
            // Track your custom metric
            track_metrics(|tracker| {
                tracker.submit_metric(TransferMetric {
                    from: from.to_string(),
                    to: to.to_string(),
                    token_id: token_id.clone(),
                    amount,
                    duration_ms: elapsed.as_millis() as u64,
                });
            });
        }

        Ok(())
    }
}
Best Practices
Note: While the SDK provides comprehensive metrics infrastructure, individual modules in the SDK don't currently use metrics directly. Most metrics are tracked at the system level (runner, sequencer, state transitions). The examples here show how you could add metrics to your custom modules.
- Always gate with
#[cfg(feature = "native")]- Metrics are not available in zkVM - Use meaningful measurement names
- A lot of the packages that Sovereign SDK runs under the hood emit metrics.
To make it easy to discern that the metrics come from a Sovereign SDK component, we
follow the pattern of
sov_in our metric names. We recommend following the patternsov_user_module_name_metric_typeso that it's easy to discern user level metric types.
- A lot of the packages that Sovereign SDK runs under the hood emit metrics.
To make it easy to discern that the metrics come from a Sovereign SDK component, we
follow the pattern of
- Separate tags and fields properly:
- Telegraf line protocol discerns between Tags and Fields by separating them with a single whitespace. Make sure to write your metrics accordingly.
- Tags: Categorical values for filtering (types, status, enum variants), both their keys and values can only be strings
- Fields: Numerical values you want to aggregate (counts, durations, amounts), their keys can be strings, and values can be one of: floats, integers, unsigned integers, strings, and booleans
- Track business-critical metrics:
- Transaction volumes and types
- Processing times for key operations
- Error rates and types
- Avoid high-cardinality tags - Don't use unique identifiers like transaction hashes as tags
Logging
The SDK uses the tracing crate for structured logging, providing rich context and efficient filtering.
Important: Logs are emitted immediately when generated and are NOT rolled back if a transaction reverts. This means failed transactions will still have their logs recorded, which is useful for debugging or monitoring why transactions failed.
Basic Logging Patterns
// Adapted from the `Bank` module
use tracing::trace;

impl<S: Spec> MyModule<S> {
    pub(crate) fn freeze(
        &mut self,
        token_id: TokenId,
        context: &Context<S>,
        state: &mut impl TxState<S>,
    ) -> Result<()> {
        // Logging at the start of operation
        trace!(freezer = %sender, "Freeze token request");

        // Redundant code elided here...

        token
            .freeze(sender)
            .with_context(|| format!("Failed to freeze token_id={}", &token_id))?;

        self.tokens.set(&token_id, &token, state)?;

        // Logging at the end of operation
        trace!(
            freezer = %sender,
            %token_id,
            "Successfully froze tokens"
        );

        Ok(())
    }
}
Using Spans for Context
Spans are like invisible context that gets automatically attached to every log line within their scope. Instead of passing context like batch_id or user_id through every function call just so you can log it, you create a span at the top level and all logs within that span automatically include that context.
Think of spans as a way to say "everything that happens from here until the span ends is part of this operation." This is especially useful when debugging - you can filter logs by span fields to see everything that happened during a specific batch process or user request.
use tracing::instrument;

// Example 1: Using the #[instrument] macro (easiest way)
#[instrument(skip(self, state, items))]  // skip large/non-Debug types
fn process_batch(&self, batch_id: BatchId, items: Vec<Item>, state: &mut impl TxState<S>) -> Result<()> {
    // The #[instrument] macro automatically adds all function parameters (except skipped ones) to the span
    // So batch_id is automatically included in all logs within this function
    info!(item_count = items.len(), "Starting batch processing");

    for (idx, item) in items.iter().enumerate() {
        // This log will show: batch_id=123 item_id=456 "Processing item"
        trace!(item_index = idx, item_id = %item.id, "Processing item");
        self.process_single_item(item, state)?;
    }

    info!("Batch processing completed");
    Ok(())
}

// Example 2: Creating spans manually (when you need more control)
fn process_user_request(&self, user_id: UserId, request: Request) -> Result<()> {
    // Create a span with context that will be included in all logs
    let span = tracing::span!(
        tracing::Level::INFO,
        "user_request", // span name
        %user_id,
        request_type = %request.request_type()
    );

    // Enter the span - all logs from here will include user_id and request_type
    let _enter = span.enter();

    debug!("Validating request");
    self.validate_request(&request)?;

    debug!("Processing request");
    self.process(&request)?;

    info!("Request completed successfully");
    Ok(())
}
Log Levels
error!- Unrecoverable errors that affect module operationwarn!- Recoverable issues or unusual conditionsinfo!- High-level operations (tx processing, module lifecycle)debug!- Detailed operational data (state changes, intermediate values)trace!- Very detailed execution flow
Best Practices
-
Structure your logs:
// Good - structured, filterable debug!(user = %address, action = "deposit", amount = %value, "Processing deposit"); // Avoid - unstructured string interpolation debug!("Processing deposit for {} of amount {}", address, value); -
Include relevant context:
- Transaction/operation IDs
- User addresses (when relevant)
- Amounts and values
- Error details
- State transitions
-
Don't log transaction reverts as errors or warnings: Transaction reverts are expected behavior. Log them at
debug!level if needed for debugging:if balance < amount { debug!( user = %sender, requested = %amount, available = %balance, "Transfer failed due to insufficient balance" ); return Err(anyhow::anyhow!("Insufficient balance")); } -
Keep frequently triggered logs at debug or trace level: Any log that gets triggered by every call to your module should use
debug!ortrace!to avoid log spam:// Good - routine operations at trace level trace!(method = "transfer", from = %sender, "Processing transfer request"); // Bad - routine operations at info level will spam logs info!("Transfer request received"); // Don't do this for every call -
Use conditional logging for expensive operations:
#[cfg(feature = "native")]
fn debug_state(&self, state: &impl StateAccessor<S>) {
    if tracing::enabled!(tracing::Level::TRACE) {
        let total_accounts = self.count_accounts(state);
        let total_balance = self.calculate_total_balance(state);
        trace!(
            %total_accounts,
            %total_balance,
            "Module state snapshot"
        );
    }
}
Set log levels via environment variables:
RUST_LOG=info,my_module=debug cargo run
SDK Contributors
This section provides an overview of the Sovereign SDK aimed at core contributors to the framework. It describes the primary components of the SDK at the level of Rust crates.
Transaction Lifecyle Overview
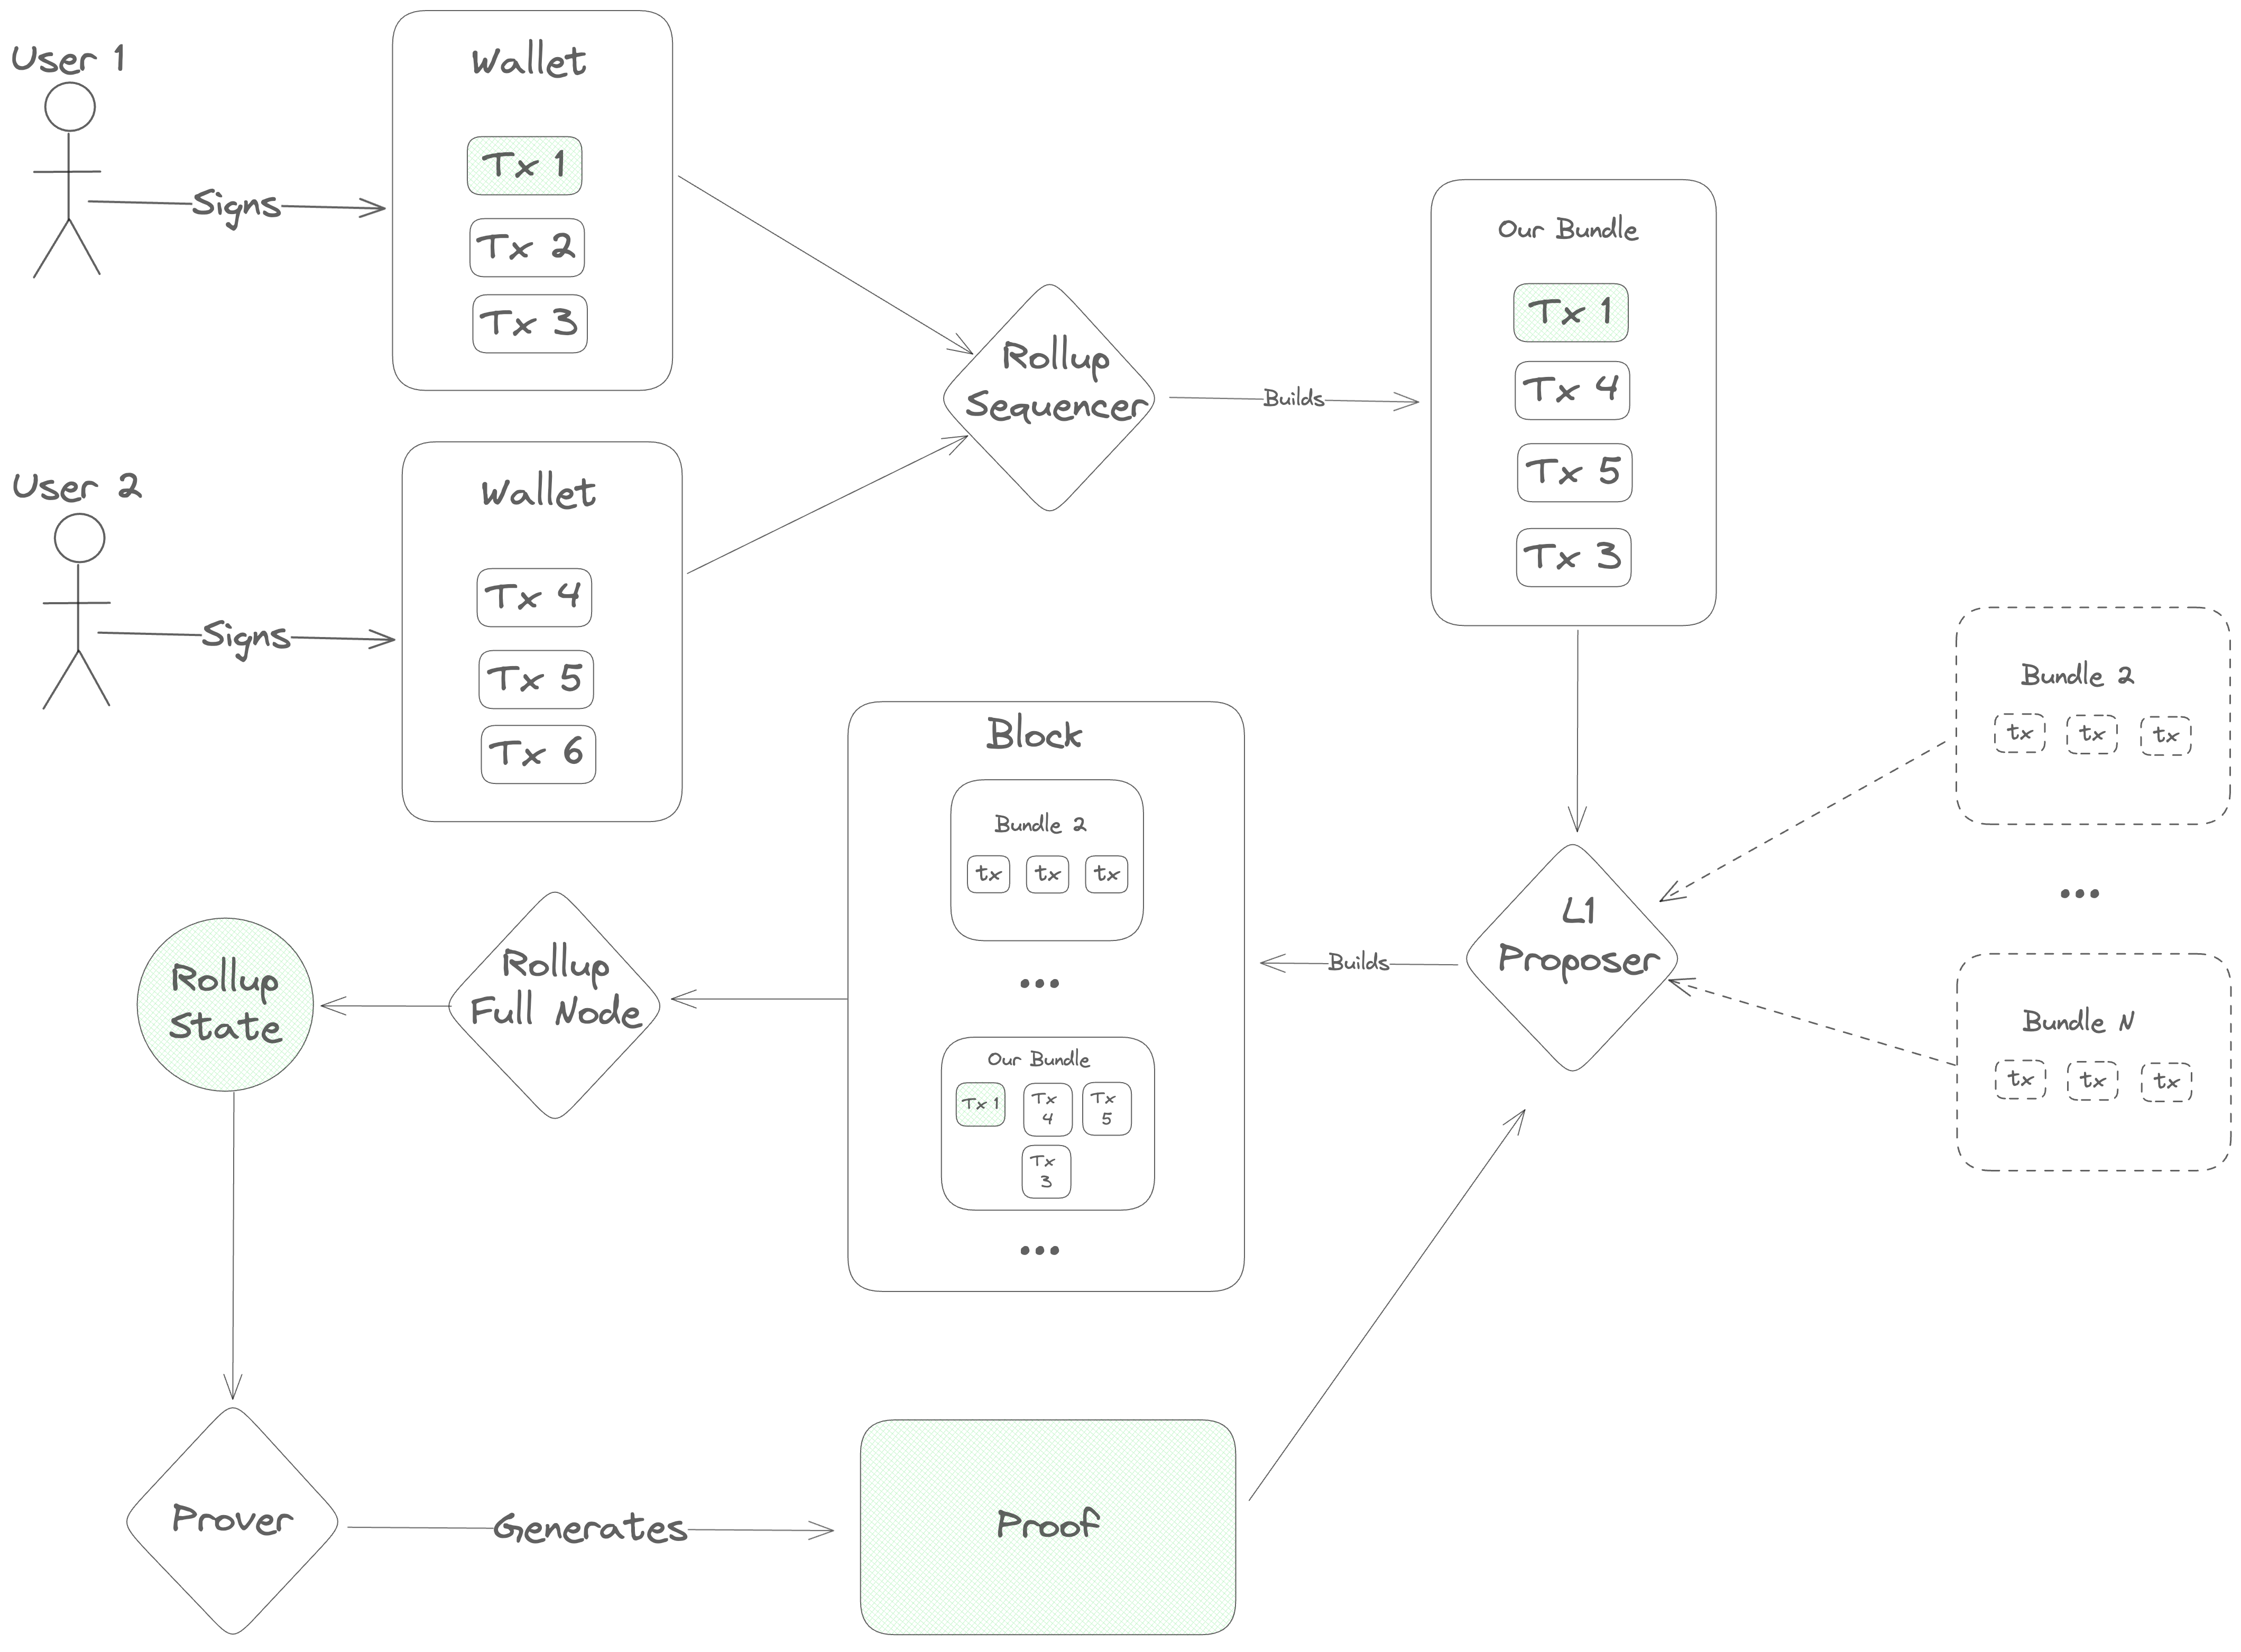
The transaction lifecycle begins with a user. First, the user opens a frontend and gets some information about the current state of the blockchain. Then, they open their wallet and sign a message indicating what action they want to take.
Once a message is signed, it needs to be ordered before full nodes can execute it, so the user's next step is to contact a sequencer to post the transaction onto the DA layer.
The sequencer accepts a number of transactions and bundles them into a single
Blob, which he sends to the DA layer for inclusion. This Blob is
ultimately sent to a Proposer on the DA layer, who includes it in his block
and gets it approved by the DA layer's validator set. Once consensus is reached
on the DA layer block containing the sequencer's Blob, the full nodes of the
rollup parse its contents and execute the transactions, computing a new rollup
state.
Next, specialized actors ("provers" or "attesters") generate a proof of the new
rollup state and post it onto the DA layer. Finally, light clients of the
rollup (end-users and/or bridges on other blockchains) verify the proof and see
the results of the transaction.
SDK Design Philosophy
Now that we've established the basic transaction lifecycle, we have the background we need to really dig into the design of the Sovereign SDK.
At a high level, the design process for the SDK was essentially just tracing the transaction lifecycle diagram and asking two questions at each step:
- "How do we implement this step so that we really 'inherit the security of the L1'?"
- "Within those constraints, how do we build the SDK to accommodate the broadest range of use cases?"
Step 1: Retrieving Information
Before doing anything, users need to find out about the current state of the rollup. How can we enable that?
At this step, we have several conflicting goals and constraints:
- We want the user's view of the rollup to be as up-to-date as possible
- We want to provide the strongest possible guarantees that the user's view of state is correct
- We want to minimize costs for the rollup
- Users may not be willing/able to download more than a few hundred kilobytes of data or do any significant computation
Obviously, it's not possible to optimize all of these constraints simultaneously. So, in the Sovereign SDK, we allow developers some flexibility to pick the appropriate tradeoffs for their rollups - and we give end-users additional flexibility to choose the setup that works best for them.
In practice, that means that...
- Developers can choose between Optimistic and ZK rollups, trading transaction cost for time-to-finality.
- Users can choose between running a full node (instant state access, but expensive), running a light client (slower state access, but much cheaper and trustless) and trusting a full node (instant state access)
Step 2: Signing Transactions
The SDK supports several signing/verification modes. The standard choice for
interacting with Sovereign SDK chains is our custom UniversalWallet, which is
available as a Metamask snap and a Ledger app. The UniversalWallet integrates
tightly with the Sovereign SDK to render transactions in human-readable format.
However, many chains need compatibility with legacy formats like Ethereum RLP
transactions or Solana instructions
We've made the pragmatic choice to be as compatible as possible with existing
crypto wallets using our RuntimeAuthenticator abstraction. By implementing the
RuntimeAuthenticatortrait, developers cab bring their own transaction
deserialization and authorization logic. Even better, we allow rollups to
support several different Authenticator implementations simultaneously. This
allows developers to retain backward compatibility with legacy transaction
formats, without compromising on support for their native functionality.
Step 3: Sequencing
Once a user has signed a transaction, we need to broadcast it to all full nodes of the rollup.
Since a primary design goal is to inherit the security of the underlying blockchain, we want to ensure that users are always able to fall back on the censorship resistance of the L1 if necessary. At the same time, we don't expect users to interact directly with the underlying blockchain in the normal case. The underlying blockchain will charge fees in its own token, and we don't need or want users of the rollup to be thinking about exchange rates and L1 gas limits.
We also need to protect the rollup from spam. In a standard blockchain, spam is handled by ensuring that everyone pays for the computation that the network does on their behalf. Transactions with invalid signatures are filtered out at the peer-to-peer layer and never get included in blocks. This means that an attacker wanting to spam the rollup has no asymmetric advantage. He can send invalid transactions to the few nodes he happens to be directly connected to, but they will just disconnect. The only way to get the entire blockchain network to process a transaction is to provide a valid signature and pay enough gas fees to cover the cost of execution.
In a rollup, things are different. Rollups inherit the consensus of an underlying blockchain which doesn't know about the transaction validity rules of the rollup. Since the underlying chain doesn't know the rules, it can't enforce them. So, we need to be prepared to deal with the fact that the rollup's ledger is dirty. This is bad news, because checking transaction signatures is expensive - especially in zero-knowledge. If we aren't careful, an attacker could flood the rollup's ledger with malformed transactions and force the entire network to pay to check thousands of invalid signatures.
This is where the sequencer comes in. Sequencers accept transactions from users
and bundle them into Blobs, which get posted onto the L1. At the rollup level,
we force all sequencers to register by locking up some tokens - and we ignore
any transactions which aren't posted by a registered sequencer. If a sequencer's
bundle includes any transactions which have invalid signatures, we slash his
deposit and remove him from the registry. This solves two problems at once.
Users don't need to worry about obtaining tokens to pay for inclusion on the
DA layer, and the rollup gets builtin spam protection.
Unfortunately, this setup also gives sequencers a lot of power. Since the sequencer handles transactions before they've gone through the DA layer's consensus mechanism, he can re-order transactions - and potentially even halt the rollup by refusing to publish new transactions.
To mitigate this power, we need to put a couple of safeguards in the protocol.
First, we allow anyone to register as a sequencer depositing tokens into the sequencer registry. This is a significant departure from most existing rollups, which rely on a single trusted sequencer.
Second, we allow sequencers to register without sending a transaction through
an existing sequencer. Specifically, we add a rule that the rollup will
consider up to K extra blobs from unregisterd sequencers in each rollup block.
If any of the first K "unregistered" blobs conform to a special format, then
the rollup will interpret them as requests to register a new sequencer. By
capping the number of unregistered blobs that we look at, we limit the
usefulness of unregistered blobs as a DOS vector while still ensuring that
honest sequencers can register relatively quickly in case of censorship.
Finally, we try to make sequencing competitive by distributing some of the fees from each transaction to the sequencer who included it. This incentivizes new sequencers to register if the quality of service is low.
Ok, that was a lot of information. Let's recap.
In the Sovereign SDK, sequencers are middlemen who post transactions onto the DA layer, but it's the DA layer which ultimately decides on the ordering of transactions. Anyone can register as a sequencer, but sequencers expose themselves to slashing if they include transactions with invalid signatures (or certain other kinds of obvious spam).
That covers a huge chunk of sequencing. But there are still two topics we haven't touched on: stateful validation, and soft confirmations.
Stateful Validation
Up to this point, we've been talking about transactions as if they're always either valid or invalid for all time, regardless of what's happening on the rollup. But in the real world (especially when there are many sequencers), that's not the case. To give just one example, it's entirely possible for an account to burn through all of its funds with a single transaction, leaving nothing to pay gas with the next time around. So, if two sequencers publish blobs at about the same time, it's very possible that the first blob will cause some tranasactions in the second one to become invalid.
This complicates our analysis. Previously, we assumed that a sequencer was malicious if he caused any invalid transactions to be processed. That meant that we could safely slash his deposit and move on whenever we encountered a validation error. But now, we can't make that assumption. Otherwise, sequencers would have to be extremely conservative about which transactions they included - since a malicious (or confused) user could potentially cause a sequencer to get slashed by sending conflicting transactions to two different sequencers at the same time.
On the other hand, we don't want to let sequencers get away with including transactions that they know are invalid. Otherwise, a malicious sequencer could include invalid transactions "for free", causing the rollup to do a bunch of wasted computation.
We address these issues by splitting transasction validation into two categories. Stateless validation (i.e. signature checks) happens first, and transactions which fail stateless validation are invalid forever. If a sequencer includes a transaction which is statelessly invalid, then we know he's malicious. After a transaction has passed stateless validation, we proceed to make some stateful checks (i.e. checking that the transaction isn't a duplicate, and that the account has enough funds to pay for gas). If these checks fail, we charge the sequencer a small fee - just enough to cover the cost of the validatoin.
This ensures that sequencers are incentivized to do their best to filter out invalid transactions, and that the rollup never does any computation without getting paid for it, without being unfairly punitive to sequencers.
Soft Confirmations
Now that we've talked about the minimum requirements for sequencer, we move on to soft-confirmations.
One of the biggest selling points of rollups today is the ability to tell users the outcome of the tranaction instantly. Under the hood, this experience is enabled by giving a single trusted sequencer a "lock" on the rollup state. Because he holds the lock, the sequencer can run a local simulation to determine the exact effect of a transaction before he posts it on the DA layer.
Unfortunately, this introduces a load bearing point of centralization. If the centralized sequencer becomes unavailable (or is malicious), the rollup halts and users have little recourse.
On existing rollups, this issue is somewhat mitigated by providing an "inbox" on the DA layer where users can send special "forced withdrawal" transactions. However, in most existing rollups these "forced" transactions are significantly less powerful than ordinary ones. (Users are often limited to only withdrawing funds) and the delay period before they are processed is long.
In the Sovereign SDK, we try to do better. Unfortunately, there's no way to enable soft confirmations without giving some entity a lock on (some subset of) the rollup state. So, this is exactly what we do. We allow rollup deployers to specify some special "preferred sequencer", which has a partial lock on the rollup state.
In order to protect users in case of a malicious sequencer, though, we make a few additional changes to the rollup.
First, we separate the rollup state into two subsets, "user" space and "kernel" space. The kernel state of the rollup is maintained programatically, and it depends directly on the headers of the latest DA layer blocks. Inside of the protected kernel state, the rollup maintains a list of all the blobs that have appeared on the DA layer, and the block number in which they appeared.
Second, we prevent access to the kernel state of the rollup during transaction execution. This prevents users from creating transactions that could accidentally invalidate soft-confirmations given by the sequencer, as well as preventing the sequencer from deleting forced transactions before they can be processsed.
Finally, we add two new invariants:
-
Every blob which appears on the (canonical) DA chain will be processed within some fixed number of blocks
-
All "forced" (non-preferred) transactions will be processed in the order they appeared on the DA layer
To help enforce these invariants, we add a concept of a "visible" slot number. The visible slot number is a nondecreasing integer which represents block number that the preferred sequencer observed when he started building his current bundle. Any "forced" blobs which appear on the DA layer are processed when the visible slot number advances beyond the number of the real slot in which they appeared.
Inside the rollup, we enforce that...
-
The visible slot number never lags behind the real slot number by more than some constant
Kslots- This ensures that "forced" transactions are always processed in a reasonable time frame
-
The visible slot number increments by at least one every time the preferred sequencer succesfully submits a blob. The sequencer may increment the virtual slot by more than one, but the maximum increment is bounded by a small constant (say, 10).
-
The visible slot number is never greater than the current (real) slot number
-
Transactions may only access information about the DA layer that was known at the time of their virtual slot's creation. Otherwise, users could write transactions whose outcome couldn't be predicted, making it impossible to give out soft confirmations. - For example, a user could say
if current_block_hash % 2 == 1 { do_something() }, which has a different outcome depending on exactly which block it gets included in. Since the rollup sequencer is not the L1 block proposer, he doesn't know what block the transaction will get included in! By limiting transactions to accessing historical information, we avoid this issue.
What all of this means in practice is that...
- The visible state never changes unless either the preferred sequencer submits a batch, or a timeout occurs (i.e. the visible slot lags too far). This ensures that the preferred sequencer always knows the exact state that he's building on top of.
- An honest sequencer wants to keep the virtual slot number as close to the real slot number as possible. This way, he has more buffer to absorb downtime without the state changing. This reduces the risk of soft-confirmations being invalidated.
- Honest sequencers can always give accurate soft confirmations, unless the DA
layer experiences a liveness failure lasting more than
Kslots. - Transactions can access information about the underlying blockchain with the best latency that doesn't invalidate soft confirmations.
Handling Preferred Sequencer Failure
With the current design, the Sovereign SDK supports soft confirmations while providing a reasonably powerful forced transaction mechanism. We also provide some limited protection from a malicious sequencer. If the sequencer is malicious, he can - at worst - delay transaction processing by some constant number of blocks. He can't prevent forced transactions from being processed, and he can't selectively delay transactions.
We also provide some limited protection if the preferred sequencer commits a slashable offense. In this case, the rollup enters "recovery mode", where it reverts to standard "based" sequencing (where all sequencer are equal). In this mode, it advances the virtual slot number two-at-a-time until the rollup is caught up, at which point the rollup behaves as if there had never been a preferred sequencer.
In the future, we may also add slashing if the preferred sequencer gives "soft-confirmations" which turn out to be invalid, but this requires some additional design work.
Step 4: Execution
Once a transaction is sequenced, the rollup needs to process it.
At a high level, a Sovereign SDK transaction goes through the following sequence:
-
(Stateless) Deserialization: Decoding the bytes of the transaction into meaningful components (signature, ChainID, etc)
-
(Stateful) Pre-validation: Checking that the address which is claiming to have authorized the transaction exists and retrieving its preferences for authorization. For example, if the address is a multisig, fetch the set of public keys and the minimum number of signatures.
-
(Usually Stateless) Authentication: Checking that the transaction is authorized. For example, checking that the signatures are valid.
-
(Stateful) Authorization: Matching the results of the authentication and pre-validation steps to decide whether to execute. This step also reserves the funds to pay for gas used during transaction execution. --- State changes up to this point are irreversable. State changes beyond this point are either committed or reverted together
-
(Stateful) Pre-dispatch hook: This hook allows all modules to inspect the transaction (and their own state) and do initialization before the transaction is executed. For example, a wallet module might use this hook to check the user's balance and store it for later retrieval. This hook may abort the transaction and revert any state changes by returning an
Error. -
(Stateful) Execution: The transaction is dispatched to a single target module for execution. That module may invoke other modules if necessary during execution. If this call returns an error, all state changes from step 5 onward are reverted.
-
(Stateful) Post-dispatch hook: This hook allows all modules to inspect their state and revert the transaction if necessary. If this call returns an error, all state changes from step 5 onward are reverted.
-
(Stateful) Post-execution: After transaction execution, any unused gas is refunded to the payer
As described in the "Sequencing" documentation, sequencers are slashed if any of the two stateless steps fail. If either of the stateful steps prior to execution fail, the sequencer is penalized - but just enough to cover the cost of the work that has been done. If the transaction fails during execution, the costs are paid by the user (or whichever entity is sponsoring the gas cost of the transaction.)
For more details on execution, see [TODO]
Step 5: Proving
Once a transaction is executed, all of the rollup full nodes know the result instantly. Light clients, on the other hand need proof. In this section, we'll describe the different kinds of proof that the Sovereign SDK offers.
Zero-Knowledge Proofs
The most powerful configuration for a rollup is zero-knowledge mode. In this mode, light clients can trustlessly sync the chain with near-zero overhead and only minutes of lag behind the chain tip. This enables fast and trustless bridging between rollups, and between the rollup and the execution environment of its DA layer (if applicable).
In the Sovereign SDK, proving is asynchronous (meaning that we post raw transactions on the DA layer - so that full nodes can compute the rollup state even before a proof is generated). This means that light clients have a view of the state that lags a little bit behind full nodes.
Proof Statements
All zero-knowledge proofs have the form, "I know of an input such that...". In our case, the full statement is:
I know of a DA layer block with hash X (where X is a public input to the proof) and a rollup state root Y (where Y is another public input) such that the rollup transitions to state Z (another public input) when you apply its transaction processing rules.
To check this proof, a client of the rollup needs to check that the input block hash X corresponds to the next DA layer block, and that the input state root Y corresponds to the current rollup state. If so, the client can advance its view of the state from Y to Z.
This works great for a single block. But if a client needs to validate the entire history of the rollup, checking proofs of each block would get expensive. To alleviate this problem, we use recursive proofs to compress multiple block proofs into one. (A nice property of zero-knowledge proofs is that the work to verify a proof is roughly constant - so checking this recursive "aggregate" proof is no more expensive than checking the proof of a single block.)
Each AggregateProof is a statement of the form:
I know of a (previous) valid
AggregateProofstarting fromA(the genesis block hash, a public input) with state rootB(the rollup's genesis state, a public input) and ending at block hashCwith state rootD. And, I know of a sequence of valid proofs such that...
- For each proof, the block header has the property that
header.prev_hashis the hash of the previous header- For each proof, the input state root is the output root of the previous root.
- The block header from the first proof has
prev_hash == C- The first proof has has input state root
D- The final proof in the chain has block hash
Aand output rootB(whereAandBare public inputs)
Incentives
Generating zero-knowledge proofs is expensive. So, if we want proofs to be generated, we need to incentivize proof creation in protocol, preferrably using the gas fees that users are already paying.
In a standard blockchain, the goal of transaction fees markets is to maximize consumer surplus. They achieve this by allocating a scarce resource (blockspace) to the people who value it most. Analysis shows that EIP-1559 is extremely good at solving this optimization problem in the setting where supply is fixed and demand varies rapidly. EIP-1559 adjusts the price of blockspace to the exact price level at which demand matches supply.
In zk-rollups, we have a slightly different setup. Our supply of blockspace is not constant. Instead, it's possible to invest more money in proving hardware in order to increase the rollup's throughput. However, bringing more prover capacity online takes time. Deals have to be negotiated, hardware provisioned, etc. So, in the short term, we model prover capacity as being fixed - and we use EIP-1559 to adjust demand to fit that target.
In the long run, we want to adjust the gas limit to reflect the actual capacity of available provers. (Note that this is not yet fully implemented). To facilitate this, we will track the rollup's gas usage and proving throughput (measured in gas per second) over time. If rollup blocks are full and provers are able to keep up, we will gradually increase the gas limit until blocks are no longer full or provers start to fall behind.
This still leaves one problem... how do we incentivize provers to bring more hardware online? After all, adding more hardware increases the gas limit, which increases the supply of blockspace. This causes congestion (and fees) to fall, increasing consumer surplus. But provers don't get paid in consumer surplus, they get paid in fees. So, adding more hardware hurts provers in two ways. It increases their costs, and it reduces the average fee level. This means that provers are incentivized to provide as little capacity as possible.
The way we handle this problem is by introducing competition. In Sovereign, we only reward the first prover to publish a valid proof of a block. Since proving is almost perfectly parallel, and provers are racing to prove the block first, a prover which adds slightly more capacity than its rivals experiences a disproportionate increase in rewards. This should encourage provers to bring as much capacity as possible.
Since we want to reward provers with funds on the rollup, we need consensus.
(Otherwise, it would be trivial to cause a chain split by creating a fork which
sent some rewards to a different prover.) So, we require provers to post their
proofs on chain. The first prover to post a valid proof of a particular block
gets rewarded with the majority of the base_fees collected from that block.
This is a deviation from EIP-1559, where all base fees are burned. Intuitively,
our construction is still safe because provers "burn" money in electricity and
hardware costs in order to create proofs. However, we also burn a small
proportion of base fees as insurance in case proving costs ever fall to
negligble levels.
Once a prover has posted his proof on the DA layer, two things happen. First, full nodes read the proof and, if it's valid reward the prover. If it's invalid, the prover has his deposit slashed. (Just like a misbehaving sequencer. Also like sequencers, data posted by un-bonded entities is ignored.) Second, light clients of the rollup download and verify the proof, learning the state of the rollup. As an implementation detail, we require proofs which get posted on chain to be domain separated, so that light clients can download just the proofs from a rollup without also needing to fetch all of the transaction data.
Summary: The proving workflow
So, putting this all together, the proving workflow looks like this:
-
A DA layer block is produced at height
N. This block contains some rollup transactions. -
Full nodes immediately process the transactions and compute a new state.
-
Provers begin generating a proof of block
N. -
(About 15 minutes later) a prover creates a valid proof of block
N. In the meantime, DA layer blocksN+1throughN+Xhave been produced.a. At this point, full nodes are aware of rollup state
N+X, while light clients are still unaware ofN -
The prover creates a new
AggregateProof, which...a. Proves the validity of the proof of block
Nb. Proves the validity of the previous
AggregateProof(which covered the rollup's history from genesis to blockN-1)c. Optionally proves the validity of proofs of blocks
N+1,N+2, ...,N+X, if such proofs are available. (Note that theAggregateProofmust cover a contiguous range of blocks starting from genesis, but it may cover any number of blocks subject to that constraint.) For concreteness, suppose that in this case the prover includes blocksN+1throughN+5. -
The prover posts the new
AggregateProofonto the DA layer at some height - call itN+30. At this point, full nodes are aware of stateN+30(which includes a reward for the prover), and light clients are aware of stateN+5. At some point in the future, a proof ofN+30will be generated, at which point light clients will become aware of the prover's reward.
Optimistic Proofs
For some rollups, generating a full zero-knowledge proof is too expensive. For these applications, the Sovereign SDK offers Optimistic Mode, which allows developers to trade some light-client latency for lower costs. With a zk-rollup, light clients have a view of the state which lags behind by about 15 minutes (the time it takes to generate a) zero- knowledge proof. However, at the end of those 15 minutes, light clients know the state with cryptographic certainty.
In an optimistic rollup, light clients have a different experience. They get some indication of the new rollup state very quickly (usually in the very next block), but they need to wait much longer (usually about a day) to be sure that their new view is correct. And, even in this case, clients only have "cryptoeconomic" certainty about the new state.
Proving Setup
In an optimistic rollup, the "proofs" checked by light clients are not (usually)
proofs at all. Instead, they are simple attestations. Attesters stake tokens on
claims like "the state of the rollup at height N is X", and anyone who
successfully challenges a claim gets to keep half of the staked tokens. (The
other half are burned to prevent an attester from lying about the state and then
challenging himself from another account and keeping his tokens). In exchange,
for their role in the process, attesters are rewarded with some portion of the
rollup's gas fees. This compensates attesters for the opportunity cost of
locking their capital.
This mechanism explains why light clients can know the state quickly with some confidence right away, but they take time to reach full certainty. Once they've seen an attestation to a state, clients know that either the state is correct, or the attester is going to lose some amount of capital. As time goes by and no one challenges the assertion, their confidence grows until it reaches (near) certainty. (The point at which clients are certain about the outcome is usually called the "finality period" or "finality delay".)
The previous generation of optimistic rollups (including Optimism and Arbitrum)
relies on running an on-chain bisection game over an execution trace to resolve
disputes about the rollup state. This requires $log_2(n)$ rounds of interaction,
where n is the length of the trace (i.e. a few hundred million). To handle the
possibility of congestion or censorship, rollups need to set the timeout period
of messages conservatively - which means that a dispute could take up to a week
to resolve.
In the Sovereign SDK, we resolve disputes by generating a zero-knowledge proof of the outcome of the disputed block. Since this only requires one round of interaction, we don't need the same challenge delay. However, we do need to account for the fact that proving is a heavy process. Generating a proof might take a few hours, and proving services might be experiencing congestion. To minimize the risk, we plan to set the finality period conservatively at first (about one day) and reduce it over time as we gain confidence.
Otherwise, the overall proving setup is quite similar to that of a zk-rollup. Just as in zk-rollups, proofs (and attestations) are posted onto the DA layer so that we have consensus about who to reward and who to slash. And, just like a zk-rollup, optimistic proofs/attestations are posted into a separate "namespace" on the DA layer (if possible) so that light clients can avoid downloading transaction data. The only other significant distinction between optimistic and zk rollups in Sovereign is that optimistic rollups use block-level proofs to resolve disputes instead of generating aggregate proofs which go all the way to genesis.
Conclusion
In the Sovereign SDK, we try to provide security, flexibility, and performance in that order.
As a contributor, it's your job to maintain that hierarchy. Security must always come first. And in blockchain, security is mostly about incentives. Especially in blockchain, you get what you incentivize. If your rollup under-prices some valuable resource, you'll get spam. If you under pay for some service, that service won't be provided reliably.
This is why incentive management is so deeply baked into the SDK. Every step - from sequencing to proving to execution to finality - needs to be carefully orchestrated to keep the incentives of the participants in balance.
Once the setup is secure, our next priority is enabling the broadest set of use cases. We try to provide maximum flexibility, and abstract as much functionality as possible into reusable components. You can read more about how we achieve flexibility at the level of Rust code in the abstractions chapter.
Finally, we optimize performance. This means eliminating redundant computation, carefully managing state access patterns, and considering the strengths and weaknesses of zero-knowledge proofs systems.
Happy hacking!
Main Abstractions
This document provides an overview of the major abstractions offered by the SDK.
- Rollup Interface (STF + DA service + DA verifier)
- sov-modules (
Runtime,Module, stf-blueprint w/ account abstraction, state abstractions)- sov-sequencer
- sov-db
- Rockbound
One of the most important principles in the Sovereign SDK is modularity. We believe strongly in separating rollups into their component parts and communicating through abstract interfaces. This allows us to iterate more quickly (since components are unaware of the implementation details of other components), and it also allows us to reuse components in contexts which are often quite different from the ones in which they were orginally designed.
In this chapter, we'll give a brief overview of the core abstractions of the Sovereign SDK
Native vs. ZK Execution
Perhaps the most fundamental abstraction in Sovereign is the separation between
"native" code execution (which computes a new rollup state) and zero-knowledge
verification of that state. Native execution is the experience you're used to.
In native execution, you have full access to networking, disk, etc. In native
mode, you typically trust data that you read from your own database, but not
data that comes over the network.
Zero-knowledge execution looks similar. You write normal-looking Rust code to do
CPU and memory operations - but under the hood, the environment is alien. In
zero-knowledge execution, disk and network operations are impossible. Instead,
all input is received from the (untrusted) machine generating the proof via a
special syscall. So if you make a call that looks like a network access, you
might not get a response from google.com. Instead, the prover will pick some
arbitrary bytes to give back to you. The bytes might correspond to an actual
response (i.e. if the prover is honest and made the network request for you) -
but they might also be specially crafted to deceive you. So, in zero-knowledge
mode, great care must be taken to avoid relying on unverified data from the
prover.
In the Sovereign SDK, we try to share code between the "native" full node
implementation and the zero-knowledge environment to the greatest extent
possible. This minimizes surface area for bugs. However, a full node necessarily
needs a lot of logic which is unnecessary (and undesirable) to execute in
zero-knowledge. In the SDK, such code is gated behind a cargo feature called
"native". This code includes RPC implementations, as well as logic to
pre-process some data into formats which are easier for the zero-knowledge code
to verify.
The Rollup Interface
If you squint hard enough, a zk-rollup is made of three separate components. There's an underlying blockchain ("Data Availability layer"), a set of transaction execution rules ("a State Transition Function") and a zero-knowledge proof system (a "ZKVM" for zero-knowledge virtual machine). In the abstract, it seems like it should be possible to take the same transaction processing logic (i.e. the EVM) and deploy it on top of many different DA layers. Similarly, you should be able to take the same execution logic and compile it down to several different proof systems - in the same way that you can take the same code an run it on Risc0 or SP1.
Unfortunately, separating these components can be tricky in practice. For example, the OP Stack relies on an Ethereum smart contract to enforce its censorship resistance guarantees - so, you can't easily take an OP stack rollup and deploy it on a non-EVM chain.
In the Sovereign SDK, flexibility is a primary design goal. So we take care to
codify this separation of concerns into the framework from the very beginning.
With Sovereign, it's possible to run any State Transition Function alongside
any Da Service on top of any (rust-compatible) proof system and get a
functional rollup. The rollup-interface crate is what makes this possible.
Every other crate in the SDK depends on it, because it defines the core
abstractions that are shared between all SDK rollups.

Inside of the rollup interface, the native vs zero-knowledge distinction
appears in numerous places. For example, the DA layer abstraction has two
components - a DaService, which runs as part of native full node execution
and provides methods for fetching data from the underlying blockchain; and
DaVerifier, which runs in zero-knowledge and verifies that the data being
executed matches the provided DA block header.
How it Works
Essentially, the Sovereign SDK is just a generic function that does this:
fn run_rollup<Da: DaService, Zk: Zkvm, Stf: StateTransitionFunction>(self, da: Da, zkvm: Zk, business_logic: Stf) {
	loop {
		// Run some `native` code to get the data for execution
		let (block_data, block_header) = da.get_next_block();
		let (input_state, input_state_root) = self.db.get_state();
		// Run some zero-knowledge code to execute the block
		let proof = zkvm.prove(|| {
			// Check that the inputs match the provided commitments
			if !da.verify(block_data, block_header) || !input_state.verify(input_state_root) {
				panic!()
			};
			// Make the data commitments part of the public proof
			output!(block_header.hash(), input_state_root)
			let output_state_root = business_logic.run(block_data, input_state);
			// Add the output root to the public proof
			output!(output_state_root)
		});
		// Publish the proof onto the DA layer
		da.publish(proof);
	}
}
As you can see, most of the heavy lifting is done by the DA layer, the Zkvm
and the rollup's business logic. The full node implementation is basically just
glue holding these components together.
DA
As discussed above, the role of the DA layer is to order and publish data. To
integrate with the Sovereign SDK, a DA layer needs to provide implementations of
two core traits: DaService and DaVerifier.
DA Service
The DaService trait is usually just a thin wrapper around a DA layer's
standard RPC client. This trait provides standardized methods for fetching data,
generating merkle proofs, and publishing data. Because it interacts with the
network, correct execution of this trait is not provable in zero-knowledge.
Instead, the work of verifying of the data provided by the DaService is
offloaded to the DaVerifier trait. Since the DaService runs only in native
code, its implementation is less concerned about efficiency than zero-knowledge
code. It's also easier to patch, since updating the DaService does not
require any light clients or bridges to update.
The DaService is the only component of the SDK responsible for publishing and
fetching data. The SDK's node does not currently have a peer-to-peer network of
its own. This dramatically simplifies the full node and reduces bandwidth
requirements.
DA Verifier
The DaVerifier is the zero-knowledge-provable counterpart of the DaService.
It is responsible for checking that the (untrusted) private inputs to a proof
match the public commitment as efficiently as possible. It's common for the
DaVerifier to offload some work to the DaService (i.e. as computing extra
metadata) in order to reduce the amount of computation required by the
DaVerifier.
At the level of Rust code, we encode the relationship between the DaVerifier
and the DaService using a helper trait called DaSpec - which specifies the
types on which both interfaces operate.
Zero Knowledge Virtual Machine ("Zkvm")
The Zkvm traits make a zk-snark system (like Risc0 or Sp1) compatible with
the Sovereign SDK. Like the DA layer, we separate Zkvm traits into a
native and zk version, plus a shared helper.
The ZkvmHost trait describes how a native computer executes an elf file
(generated from Rust code) and generates a zero-knowledge proof. It also
describes how the native machine passes private inputs (the "witness") into
the execution.
The ZkvmGuest trait describes how a program running in zero-knowledge mode
accepts inputs from the host machine.
Finally, the ZkVerifier trait describes how a proof generated by the host is
verified. This trait is implemented by both the Host and the Guest, which is
how we represent that proofs must be verifiable natively and recursively (i.e.
inside another SNARK.)
State Transition
A StateTransitionFunction ("STF") is a trait which describes:
-
How to initialize a rollup's state at genesis
-
How to apply the data from the DA layer to generate a new state
In other words, the implementation of StateTransitionFunction is what defines
the rollup's "business logic".
In the Sovereign SDK, we define a generic full node which can run any STF. As long as your logic implements the interface, we should be able to run it.
However, implementing the business logic of a rollup is extremely complicated.
While it's relatively easy to roll your own implementation of the Da or Zkvm
traits, building a secure STF from scratch is a massive undertaking. It's so
complex, in fact, that we assume no one will ever do it - andthe vast majority
of the Sovereign SDK's code is devoted to providing a generic implementation of
an STF that developers can customize. (This STF is what we call the Sovereign
module system, or sov-modules).
So if no one is ever going to implement the StateTransitionFunction interface,
why bother maintaining it at all? One reason is for flexibility. Just because we
don't expect anyone to roll their own STF doesn't mean that they won't. But a
bigger motivation is to keep concerns separate. By hiding the implementation
details of the rollup behind the STF interface, we build a firm abstraction
barrier between it and the full node. This means that we're free to make
breaking changes on either side of the wall (either in the node, or in the STF)
without worrying about breaking the other component.
Sov Modules
Outside of the rollup interface, the most important abstraction is
sov-modules. sov-modules is a pre-built STF with pluggable... modules. It
does the heavy lifting of implementing a secure STF so that you can focus on the
core logic of your application.
The Runtime
At the heart of any sov-modules rollup is the Runtime:
// An example runtime similar to the one used in our "standard" demo rollup
pub struct Runtime<S: Spec> {
    /// The Bank module implements fungible tokens, which are needed to charge `gas`
    pub bank: sov_bank::Bank<S>,
    /// The Sequencer Registry module is where we track which addresses can send batches to the rollup
    pub sequencer_registry: sov_sequencer_registry::SequencerRegistry<S>,
    /// The Prover Incentives module is where we reward provers who do useful work
    pub prover_incentives: sov_prover_incentives::ProverIncentives<S>,
    /// The Accounts module implements identities on the rollup. All of the other modules rely on it
	/// to link cryptographic keys to logical accounts
    pub accounts: sov_accounts::Accounts<S>,
	/// The NFT module provides an implementation of a non-fungible token standard. It's totally optional.
    pub nft: sov_nft_module::NonFungibleToken<S>,
    #[cfg_attr(feature = "native", cli_skip)]
    /// The EVM module lets the rollup run Ethereum smart contracts. It's totally optional.
    pub evm: sov_evm::Evm<S, Da>,
}
At the highest level, a runtime is "just" a collection of all the modules which
are included in your rollup. Its job is to take Transactions and dispatch them
to the appropriate module for execution.
Pretty much all rollups built with the sov-modules include the bank, the
sequencer registry, and the accounts module in their Runtime. They also
usually include one of sov_prover_incentives (if they're a zk-rollup) or
sov_attester_incentives (if they're an Optimistic rollup).
You may also have noticed that the Runtime is generic over a Spec. This
Spec describe the core types (addresses, hashers, cryptography) used by the
rollup and the DA layer. Making your runtime generic over a Spec means that you
can easily change DA layers, or swap any of the core primitives of your rollup.
For example, a rollup can trivially switch from Ed25519 to secp256k1 for its
signature scheme by changing the implementation of its Spec trait.
Modules
"Modules" are the things that process transactions. For example, the Bank
module lets users transfer tokens to each other. And the EVM module implements
a full Ethereum Virtual Machine that can process any valid Ethereum transaction.
A Module is just a rust struct that implements two traits called Module
and ModuleInfo.
The Module trait
The Module trait is like a simplified version of the
StateTransitionFunction. It describes how to initialize the module at the
rollup's genesis, and how the module processes CallMessages received from
users (i.e. how it processes transactions)
pub trait Module {
	// -- Some associated type definitions are omitted here --
	/// Module defined argument to the call method.
    type CallMessage: Debug;

    /// Genesis is called when a rollup is deployed and can be used to set initial state values in the module.
    fn genesis(
        &self,
        _config: &Self::Config,
        _working_set: &mut WorkingSet<Self::Spec>,
    ) -> Result<(), ModuleError>;

    /// Processes a transaction, updating the rollup state.
    fn call(&self,
        _message: Self::CallMessage,
        _context: &Context<Self::Spec>,
        _state: &mut impl TxState<S>,
    ) -> Result<CallResponse, ModuleError>;
}
You'll notice that the call function takes three arguments: an associated
CallMessage type, a Context, and a WorkingSet.
-
The
CallMessagetype is the deserialized content of the user's transaction - and the module can pick any type to be itsCallMessage. In most cases, modules use anenumwith one variant for each action a user might want to take. For example, theBank::CallMessagetype has variants for minting, transferring, and burning tokens. -
The
Contexttype is relatively straightforward. It simply contains the address of the sequencer, who published the transaction, the identity of the transaction's signer, and the current block height. -
The
TxStateis the most interesting of the three, but it needs a little bit of explanation. In the Sovereign SDK, the ruststructwhich implements aModuledoesn't actually contain any state. Rather than holding actual values, the module simply defines the structure of some items in state. All of the actual state of the rollup is stored in theStateobject, which is in-memory layer on top of the rollup's database (in native mode) or merkle tree (in zk mode). TheStateabstraction handles commit/revert semantics for you, as well as taking responsibility for caching, deduplication, and automatic witness generation/checking. It also provides utilities for charginggasand emittingevents.
The Accounts module provides a good example of a standard Module trait
implementation.
pub enum CallMessage<S: Spec> {
    /// Updates a public key for the corresponding Account.
    /// The sender must be in possession of the new key.
    UpdatePublicKey(
        /// The new public key
        <S::CryptoSpec as CryptoSpec>::PublicKey,
        /// A valid signature from the new public key
        <S::CryptoSpec as CryptoSpec>::Signature,
    ),
}

impl<S: Spec> sov_modules_api::Module for Accounts<S> {
	// -- Some items ommitted here --
    fn call(
        &self,
        msg: Self::CallMessage,
        context: &Context<S>,
        working_set: &mut WorkingSet<S>,
    ) -> Result<sov_modules_api::CallResponse, Error> {
        match msg {
            call::CallMessage::UpdatePublicKey(new_pub_key, sig) => {
				// Find the account of the sender
				let pub_key = self.public_keys.get(context.sender(), working_set)?;
				let account = self.accounts.get(&pub_key, working_set);
				// Update the public key
				self.accounts.set(&new_pub_key, &account, working_set);
				self.public_keys
					.set(context.sender(), &new_pub_key, working_set);
				Ok(Default::default())
            }
        }
    }
}
The ModuleInfo trait
The ModuleInfo trait describes how the module interacts with the broader
module system. Each module has a unique ID and stores its state under a unique
prefix of the global key-value store provided by sov-modules
pub trait ModuleInfo {
    /// Returns id of the module.
    fn id(&self) -> &ModuleId;

    /// Returns the prefix where module state is stored.
    fn prefix(&self) -> ModulePrefix;

    /// Returns addresses of all the other modules this module is dependent on
    fn dependencies(&self) -> Vec<&ModuleId>;
}
Unlike the Module trait, its incredibly rare for developers to implement
ModuleInfo by hand. Instead, it's strongly recommended to derive the
ModuleInfo using our handy macro. A typical usage looks like this:
#[derive(ModuleInfo, Clone)]
pub struct Bank<S: sov_modules_api::Spec> {
    /// The id of the sov-bank module.
    #[id]
    pub(crate) id: ModuleId,

    /// The gas configuration of the sov-bank module.
    #[gas]
    pub(crate) gas: BankGasConfig<S::Gas>,

    /// A mapping of [`TokenId`]s to tokens in the sov-bank.
    #[state]
    pub(crate) tokens: sov_modules_api::StateMap<TokenId, Token<S>>,
}
This code automatically generates a unique ID for the bank module and stores it
in the field of the module called id. It also initializes the StateMap
"tokens" so that any keys stored in the map will be prefixed the with module's
prefix. This prevents collisions in case a different module also declares a
StateMap where the keys are TokenIds.
Module State
The Sovereign SDK provides three core abstractions for managing module state. A
StateMap<K, V> maps arbitrary keys of type K to arbitrary values of type
V. A StateValue<V> stores a value of type V. And a StateVec<V> store an
arbitrary length vector of type V. All three types require their arguments to
be serializable, since the values are stored in a merkle tree under the hood.
All three abstractions support changing the underlying encoding scheme but
default to Borsh if no alternative is specified. To override the default,
simply add an extra type parameter which implements the StateCodec trait. (i.e
you might write StateValue<Da::BlockHeader, BcsCodec> to use the Bcs
serialization scheme for block headers, since your library for DA layer types
might only support serde-compatible serializers).
All state values are accessed through TxState. For example, you always write
my_state_value.get(&mut state) to fetch a value. It's also important to
remember that modifying a value that you read from state doesn't have any effect
unless you call my_value.set(new, &mut working_set).
Merkle Tree Layout
sov-modules currently uses a generic
Jellyfish Merkle Tree for its
authenticated key-value store. (Generic because it can be configured to use any
32-byte hash function). In the near future, this JMT will be replaced with the
Nearly Optimal Merkle Tree
that is currently under development.
In the current implementation, the SDK implements storage by generating a unique
(human-readable) key for each StateValue, using the hash of that key as a path
in the merkle tree. For StateMaps, the serialization of the key is appended to
that path. And for StateVecs, the index of the value is appended to the path.
For example, consider the following module:
// Suppose we're in the file my_crate/lib.rs
#[derive(ModuleInfo, Clone)]
pub struct Example<S: sov_modules_api::Spec> {
    #[id]
    pub(crate) id: ModuleId,
    #[state]
    pub(crate) some_value: sov_modules_api::StateValue<u8>,
    #[state]
    pub(crate) some_vec: sov_modules_api::StateVec<u64>,
    #[state]
    pub(crate) some_map: sov_modules_api::StateMap<String, String>,
}
The value of some_value would be stored at the path
hash(b"my_crate/Example/some_value"). The value of the key "hello" in
some_map would be stored at hash(b"my_crate/Example/some_map/⍰hello") (where
⍰hello represents the borsh encoding of the string "hello") etc.
However, this layout may change in future to provide better locality. For more details... ask Preston, I guess.
Exotic State Variants
In addition to the standard state store, we support two other kinds of state:
KernelStateValues or (maps/vecs) act identically to regular StateValues, but
they're stored in a separate merkle tree which is more tightly access
controlled. This mechanism allows the rollup to store data that is inaccessible
during transaction execution, which is necessary to enable soft-confirmations
without sacrificing censorship resistance. For more details, see the section on
soft-confirmations in the transaction lifecycle
documentation. The global "state root" returned by the sov-modules from the
StateTransitionFunction implementation is the hash of the kernel state root
with the regular state root. We do our best to hide this detail from users of
the SDK, though. Merkle proofs are automatically generated against the global
root, so users don't need to worry about which state trie there values are in.
AccessoryStateValue or (map/vec) types are similar to Kernel types except
that their values are not readable from inside the state transition function
at all. Under the hood, these value are stored in the rollup's database but not
in either merkle tree. This is useful for creating data that will be served via
RPC but never accessed again during execution - for example, the transaction
receipts from an Ethereum block.
The STF Blueprint
The last key component of a sov-modules rollup is the stf-blueprint. This
"blueprint" provides a generic implementation of a StateTransitionFunction in
terms of a Runtime (described above) and a Kernel (which provides
security-critical functionality like censorship resistance in a way that's
isolated from the transaction execution logic).
The STF blueprint implements the following high-level workflow:
- Take all of the new data
Blobs read from the DA layer and send them to theKernel. TheKernelwill return a list of deserializedBatches of transactions as well as the currentgasprice. (A "Batch" is a "Blob" sent by a registered sequencer that has been succesfully deserialized into a list ofTransactions)
- Note that the list of
Batches returned by theKerneldoes not necessarily correspond exactly to the incomingBlobs. TheKernelmight decide to ignore some Blobs, or to store some in its internal state for "deferred" execution. It might also add someBatches saved from a previous slot.
-
Run the
begin_slothook, allowing modules to execute any initialization logic -
For each batch initialize the sequencer reward to zero and run the
begin_batchhook. Apply the transactions, rewarding or penalizing the sequencer as appropriate. Finally, run theend_batchhook -
Run the
end_slothook to allow modules to execute any final logic. -
Compute the state change set and state root based on the transactions that were executed.
-
Execute the
finalizehook, which allows modules to compute any summary information from the change set and make it available via RPC.
For more details on the process of applying individual transactions, see the transaction lifecycle document.
Sequencer Registration via Forced Inclusion
Forced inclusion is a strategic mechanism in rollups designed to circumvent sequencers that censor user transactions. It allows users to directly submit transaction batches to the Data Availability Layer instead of going through a sequencer.
The Sovereign SDK supports this feature under specific conditions and guidelines. Crucially, only "Register Sequencer" transactions are accepted for forced inclusion; all other types will be ignored. For more details, see the Rules section.
Usage
The Sovereign SDK limits the number of batches from unregistered sequencers processed per rollup slot. This measure limits the use of this mechanism as a denial-of-service (DOS) attack vector.
Process for Forced Registration
- Create a batch containing a valid "Register Sequencer" transaction.
- Submit the batch to the Data Availability layer.
- Rollup nodes collect and execute the transaction.
- If the transaction complies with all rules, the user is registered as a sequencer and can submit regular transaction batches.
Rules
To ensure forced inclusion requests are processed correctly, the following rules apply:
- Transaction Limit: Only the first transaction in each batch is taken into account. Any additional transactions will be discarded.
- Transaction Type: The transaction must be a "Register Sequencer" transaction.
- Transaction Construction: The transaction must be properly formatted and comply with standard transaction rules.
- Financial Requirements: Users must have enough funds to cover:
- Pre-execution checks (including signature validation, deserialization and transaction type checks).
- Transaction execution costs.
- A bond required for sequencer registration.
Gas Specification
This document contains a detailed specification of the way gas is handled within
Sovereign's SDK. We use <., .> to denote the scalar product of two
multidimensional quantities.
Definition
Gas is an ubiquitous concept in the blockchain space. It is a measure of the computational effort required to perform an operation as part of a transaction execution context. This is used to prevent the network from getting spammed by regulating the use of computational resources by each participant in the network.
High level overview
We have drawn a lot of inspiration from the Ethereum gas model in our gas mechanism design. Given that Ethereum's gas is well understood and widely used in the crypto industry, we believe that this will help users onboard more easily while providing strong security guarantees out-of-the box. We have deliberately chosen to tweak some concepts that were ill-suited to the rollups built using Sovereing's SDK. In particular, sorted decreasing order of importance:
- We are using multidimensional gas units and prices.
- We plan to using a dynamic gas target. Otherwise, the rollups built with Sovereign's SDK follow the EIP-1559 specification by default.
- Rollup transactions specify a
max_fee,max_priority_fee_bips, and optional gas limitgas_limit. The semantics of these quantities roughtly match their definition in the EIP-1559 specification. - Transaction rewards are decomposed into
base_feeandpriority_fee. Thebase_feeis only partially burnt by default, the remaining amount is used to reward provers/attesters. Thepriority_feeis used to reward the block sequencers. - We are charging gas for every storage access within the module system by default.
- Customers of the SDK will have access to wrappers that allow to charge gas for hash computation and signature checks.
A design for multidimensional gas
Sovereign SDK's rollups use multidimensional gas units and prices. For example, this allows developers to take into account the differences between native and zero-knowledge computational costs for the same operation. Indeed:
- Hashing is orders of magnitude more expensive when performed inside a
zero-knowledge circuit. The cost of proving the correct computation of two
different Hash may also vary much more than the cost of computing the hash
itself (
PoseidonorMiMcvsSha2). - Accessing a storage cell for the first time is much more expensive in
zkmode than innativemode. But hot storage accesses are practically free in zero-knowledge.
In the Sovereign SDK, we currently meter consumption in two dimensions - compute and memory.
We have chosen to follow the multi-dimensional EIP-1559 design for the gas pricing adjustment formulas. In essence:
- We are performing the gas price updates for each dimension separately. In other words, each dimension follows a separate uni-dimensional EIP-1559 gas price adjustment formula.
- The gas price adjustment formula uses a
gas_targetreference, which is a uni-dimensional gas unit that is compared to the gas consumedgas_used. Thegas_priceis then adjusted to regulate the gas throughtput to get as close as possible to thegas_target. We have the following invariant:0 <= gas_used_slot <= 2 * gas_target. - Contrarily to Ethereum, we are planning to design a dynamic
gas_target. The value of thegas_targetwill vary slowly to follow the evolution of the rollup metrics we have described above. That way, Sovereign rollups can account for major technological improvements in computation (such as zk-proof generation throughtput), or storage cost. - Every transaction has to specify a scalar
max_feewhich is the maximum amount of gas tokens that can be used to execute a given transaction. Similarly, users have to specify amax_priority_fee_per_gasexpressed in basis points which can be used to reward the transaction sequencer. - The final sequencer reward is:
seq_reward = min(max_fee - <base_fee, gas_price>, max_priority_fee_per_gas * <base_fee, gas_price>). - Users can provide an optional
gas_limitfield which is a maximum amount of gas to be used for the transaction. This quantity is converted to a uni-dimensionalremaining_fundsquantity by taking the scalar product with the currentgas_price. - If users provide the
gas_limit, the rollup checks that<gas_limit, current_gas_price> <= max_fee(ie, the scalar product with the currentgas_price). If the check fails, the associated transaction is not executed and the rollup raises aReserveGasErrorReason::CurrentGasPriceTooHigherror.
Charging gas for state accesses.
State accessors such as the WorkingSet or the PreExecWorkingSet charge some
gas whenever state is modified. If these accessors run out of gas, they return a
StateAccessorError and the execution gets reverted (or the sequencer is
penalized). Some state accessors - like StateCheckpoint, the TxScratchpad or
the ApiStateAccessor - don't charge for gas for state accesses. In that case,
the access methods return a Result<T, Infallible> type which can be unwrapped
safely using unwrap_infallible.
For now, we are enforcing simple cached access patterns - we are refunding some gas if the value that is accessed/modified is hot (ie has been already accessed and is cached).
Gas rewards.
The gas consumed during transaction execution is used to reward both
provers/attesters and block sequencers. The base_fee, ie the total amount of
gas consumed by the transaction execution is partially burnt (the amount to burn
is specified by the PERCENT_BASE_FEE_TO_BURN constant), and the remaining
portion is locked in a reward pool to be redeemed by provers/attesters. The
priority_fee is also partially burnt and used to reward block sequencers.
Additional data structures that can be used to charge gas.
We have a couple of additional data structures that can be used to charge gas. These are:
MeteredHasher: a wrapper structure that can be used to charge gas for hash computation.MeteredSignature: a wrapper structure that can be used to charge gas for signature checks.MeteredBorshDeserialize: a supertrait that can be used to charge gas for structures implementingBorshDeserialize.
Structure of the implementation
The core of the gas implementation is located within the sov-modules-api crate
in the following modules/files:
module-system/sov-modules-api/src/common/gas.rs: contains the implementation of theGasandGasMetertraits. These are the core interfaces that are consumed by the API. TheGastrait defines the way users can interact with multidimensional gas units. TheGasMeteris the interface implemented by every data structure that contains or consumes gas (such as theWorkingSetwhich contains aTxGasMeter, or thePreExecWorkingSetthat may contain aSequencerStakeMeter).module-system/sov-modules-api/src/common/hash.rs: contains the implementation of theMeteredHasherwhich is a wrapper structure that can be used to charge gas for hash computation.module-system/sov-modules-api/src/transaction.rs: contains the representation of the transaction type that is used within the SDK. These structures contain themax_fee,max_priority_fee_bipsandgas_limitfields that represent the maximum amount of gas tokens to use for the transaction, the maximum priority fee to pay the sequencer (in basis points), and an optionnal multidimensional gas limit (ie the maximum amount of gas to be consumed for this transaction).
Outside of the sov-modules-api, within the module system:
module-system/module-implementations/sov-chain-state/src/gas.rs:compute_base_fee_per_gascontains the implementation of the gas price update which follows our modified version of theEIP-1559. The gas price is updated within theChainState's module lifecycle hooks (ChainState::begin_slot_hookupdates the gas price,ChainState::end_slot_hookupdates the gas consumed by the transaction).module-system/module-implementations/sov-sequencer-registry/src/capabilities.rs: contains the implementationn of theSequencerStakeMeterwhich is the data structure used to meter the sequencer stake before the transaction's execution starts.
Revenue Share for Premium Components
When using Sovereign SDK's premium components (such as the ultra-low latency soft-confirming sequencer), applications that generate revenue must comply with the Sovereign Permissionless Commercial License. This guide walks you through the implementation. Note: Non-commercial and non-production use of the SDK is exempt from the revenue share requirements.
License Requirements
The license requires two things:
- Revenue Sharing: Share a portion of revenue from transactions processed by the preferred sequencer
- Notification: Contact Sovereign Labs before production deployment with rollup access details
The sov-revenue-share module handles the revenue sharing automatically, ensuring compliance while you focus on building your application.
How Revenue Sharing Works
The module acts as an escrow for Sovereign Labs' revenue share:
- Default Rate: 10% (1,000 basis points) - Under the license, Sovereign Labs may modify the default rate but may not increase it above 10%
- Activation: Disabled by default; Sovereign Labs activates it when ready
- Conditional: Only applies to transactions from the preferred sequencer
- Flexible: Supports any token compatible with
sov-bank
Implementation
The revenue share module is included in the starter template. You just need to integrate it where your application generates revenue.
Step 1: Add the Module Reference
Add the revenue share module to your application:
#[derive(Clone, ModuleInfo, ModuleRestApi)]
pub struct YourApp<S: Spec> {
    #[id]
    pub id: ModuleId,

    #[module]
    pub revenue_share: sov_revenue_share::RevenueShare<S>,

    // ... other modules
}
Step 2: Share Revenue on Fee Collection
When collecting fees, check if the transaction came from the preferred sequencer and share accordingly:
pub fn charge_fee(
    &mut self,
    payer: &S::Address,
    total_fee: Amount,
    token_id: TokenId,
    context: &Context<S>,
    state: &mut impl TxState<S>,
) -> anyhow::Result<()> {
    // Only share revenue for preferred sequencer transactions
    if self.revenue_share.is_preferred_sequencer(context, state) {
        self.revenue_share.compute_and_pay_revenue_share(
            payer,
            token_id,
            total_fee,
            state
        )?;
    }

    // Continue with your fee logic...
    Ok(())
}
This pattern ensures you only share revenue when required. For custom implementations, use get_revenue_share_percentage_bps() and pay_revenue_share() directly.
Production Deployment Requirements
Before deploying to production, you must notify Sovereign Labs at info@sovlabs.io with:
- Documentation: Link to or copy of your rollup interaction docs
- API Endpoint: Where Sovereign can submit revenue share admin transactions
- Must cover reasonable gas costs (via direct transfer, paymaster, or agreed method)
- Schema (if not available via API): Your rollup's universal wallet schema JSON
This notification ensures Sovereign Labs can manage the revenue share module as intended by the license.
Questions?
- Technical issues: Join our Slack community
- Licensing questions: Contact info@sovlabs.io