Wallets and Accounts
This section covers how accounts are created, which wallets are supported, and how transactions are signed in the Sovereign SDK. In the quickstart, you already submitted a transaction using an example js script; now, we'll explore the concepts behind that interaction.
The core design principle is Ethereum wallet compatibility. Sovereign SDK rollups use standard Ethereum addresses and signatures (Secp256k1), and provide compatibility with many popular wallets. However, there are some important nuances to understand.
The Sovereign SDK Transaction Type
A critical distinction to grasp is that while addresses and signatures are Ethereum-compatible, the transaction format itself is unique to your rollup. A Sovereign SDK rollup does not natively accept standard Ethereum transactions.
Instead, your rollup's Runtime defines a custom RuntimeCall enum in Rust, which represents all possible actions a user can take. When a user sends a transaction, they are sending a signed message that contains this RuntimeCall. Remember the call object you created in the quickstart?
// From the quickstart's examples/starter-js/src/index.ts
const call = {
    value_setter: {
        set_value: 99,
    },
};
This JavaScript object is a direct representation of a RuntimeCall variant. The Sovereign web3.js library takes this object, serializes it into a compact binary format, and then uses a signer to sign the hash of that data.
Signing Transactions Today: The web3.js SDK & Privy
The primary way for users and developers to sign and submit these custom transactions today is through the Sovereign web3.js client library. This library provides two main signer implementations:
1. Secp256k1Signer (For Developers)
This is a straightforward signer for programmatic use where you have direct access to a raw private key. It's perfect for scripting, backend services, or testing. The script you used in the quickstart uses this signer behind the scenes, with the private key pre-configured to match the admin address from your genesis.json.
import { Secp256k1Signer } from "@sovereign-labs/signers";

// Initialize with a raw private key
const privKey = "0d87c12ea7c12024b3f70a26d735874608f17c8bce2b48e6fe87389310191264";
const signer = new Secp256k1Signer(privKey);

// Use the signer to send a transaction
await rollup.call(callMessage, { signer });
2. PrivySigner (For User-Facing Applications)
For most applications, asking users for a private key is not feasible or secure. This is where Privy comes in. Privy is a powerful wallet-as-a-service provider that allows users to create a non-custodial wallet using familiar Web2 logins like email or social accounts. They can also connect their existing wallets (like MetaMask or Phantom).
The sov-rollup-starter repository includes a full example of integrating the PrivySigner, making it the most realistic and user-friendly way to onboard users to your rollup today. It handles all the complexity of wallet creation and signing, allowing users to interact with your application seamlessly.
The Future: Supporting All Ethereum Wallets by Leveraging EIP-712
While Privy provides an excellent experience, it is crucial to meet users where they're at and enable support for all existing Ethereum wallets (including hardware wallets). This will be enabled by implementing a new EIP-712 Authenticator for the Sovereign SDK runtime (which we hope to complete by August 24, 2025).
EIP-712 is an Ethereum standard for signing typed, structured data. Instead of asking the user to sign a cryptic hash, EIP-712 allows wallets to display the transaction data in a human-readable, key-value format. This dramatically improves security and user experience, as users can see exactly what they are approving.
For example, a signature request using EIP-712 would look like this in MetaMask:
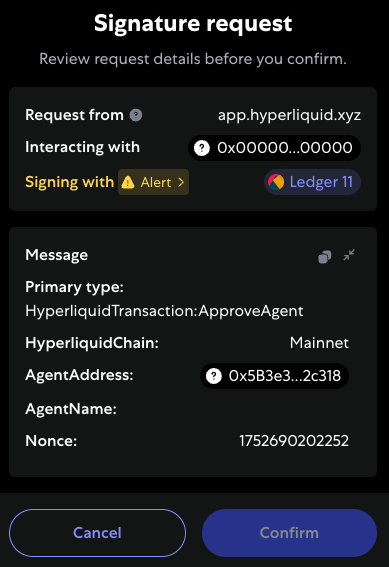
This upcoming feature, inspired by the pioneering work of Hyperliquid, will allow developers to support all Ethereum wallets.
Next Steps: Advanced Features
You now have a complete picture of how to build a module and enable users to interact with it.
In the next chapter, "Advanced Topics," you'll learn about hooks, custom APIs, and other powerful features that will allow you to build complex onchain applications.